Nodes Management
This feature provides information and management options for all nodes managed by ClusterControl. The Nodes view lists every managed node with a real-time summary of its status, last-seen timestamp, and a dropdown of available management actions.
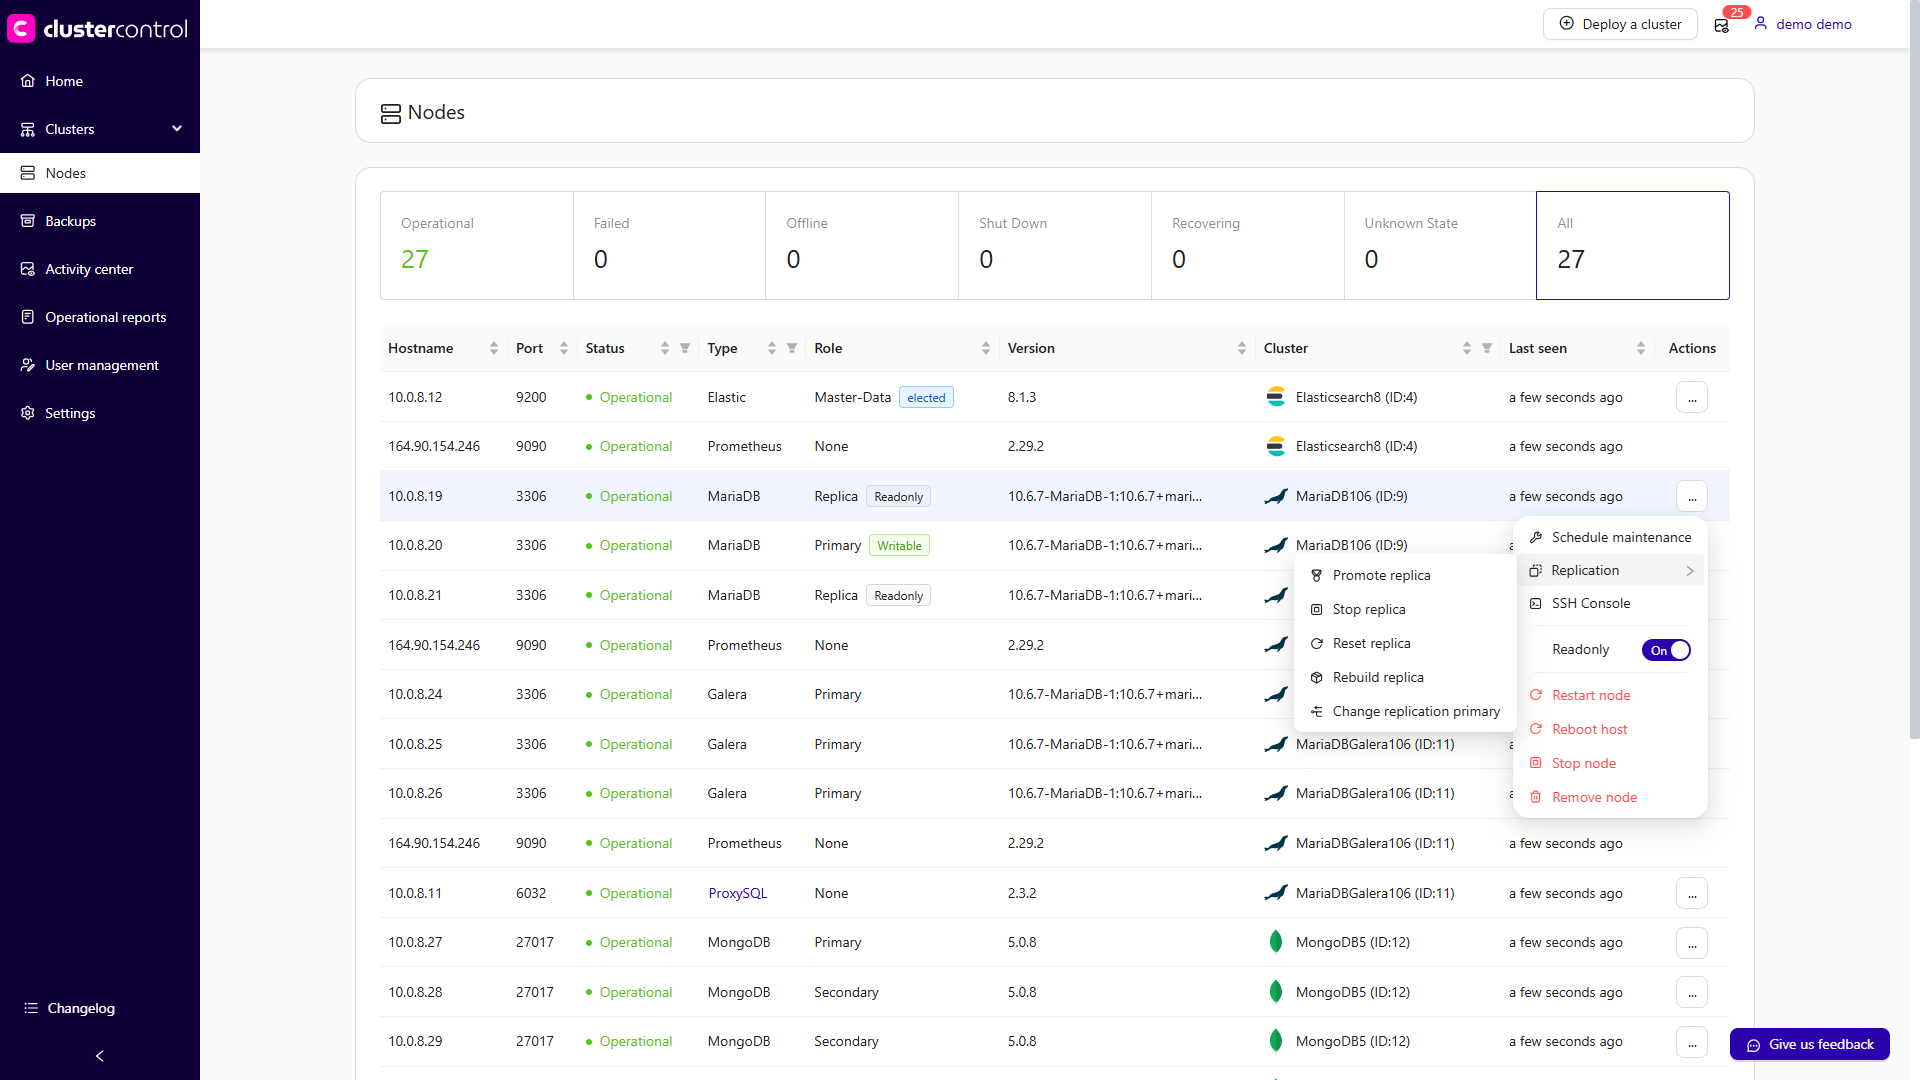
Each entry displays the following details:
| Column | Description |
|---|---|
| Hostname | The node name recognized by ClusterControl. If you used an IP address during cluster deployment or import, the IP address is shown instead. |
| Port | The active port for the corresponding host. Every managed node is identified by a host:port pair. |
| Status | The node's current operational status. |
| Type | The node's cluster type. |
| Role | The node's role within its cluster (e.g., primary, replica, arbiter). |
| Version | The database or service version running on the node. |
| Cluster | Rolling over the cluster name displays a pop-up with cluster details. |
| Last seen | The timestamp of the last successful check-in between ClusterControl and the node. |
| Actions | A context-sensitive dropdown menu with management actions available for the node. See Node Actions below. |
Access the Nodes section
Log in to your ClusterControl GUI → choose a database cluster → Nodes. This will bring up the Nodes panel listing all managed nodes for the selected cluster.
Node Actions
The Actions dropdown on each node row provides shortcuts to node-level operations. The available actions differ depending on the cluster type and the node's role. The sections below describe each action and how to perform it across the supported interfaces.
Restart node
Restarts the active monitored process of the selected node (e.g., the MySQL service, the HAProxy process). This is a service restart, not a system reboot. The action is only available when the service is currently running. The node enters maintenance mode automatically until the service is fully restarted.
Note
You can configure the Graceful shutdown timeout (default: 1800 seconds). If the node has not stopped within this period, you can toggle Force stop the nodes (after shutdown time) to send a SIGKILL signal and force the process down.
Applies to: MySQL/MariaDB, Galera Cluster, Group Replication, PostgreSQL/TimescaleDB, MongoDB, Redis, Microsoft SQL Server, Elasticsearch, Valkey, HAProxy, PGBouncer, Keepalived, ProxySQL, Prometheus
- Log in to your ClusterControl GUI → choose a database cluster → Nodes.
- Locate the node you want to restart.
- Click Actions (…) → Restart node.
- Optionally, adjust the Graceful shutdown timeout or toggle Force stop the nodes (after shutdown time).
- Confirm the action to proceed.
Reboot host
Initiates a full operating system reboot of the selected node. Once initiated, ClusterControl monitors the reboot progress every 5 seconds for up to 10 minutes (600 seconds). If the node does not come back online within this window, the operation is declared failed.
Applies to: MySQL/MariaDB, Galera Cluster, Group Replication, PostgreSQL/TimescaleDB, MongoDB, Redis, Microsoft SQL Server, Elasticsearch, Valkey, HAProxy, PGBouncer, Keepalived, ProxySQL, Prometheus
- Log in to your ClusterControl GUI → choose a database cluster → Nodes.
- Locate the node you want to reboot.
- Click Actions (…) → Reboot host.
- Confirm the action to proceed. ClusterControl will initiate the OS-level reboot and track its progress.
Stop/Start node
Stops or starts the managed service on the selected node. For database nodes, ClusterControl stops or starts the database service bound to the given host:port. For load balancer nodes (HAProxy, ProxySQL), the load balancer process is stopped or started instead.
Note
By default, a graceful shutdown is attempted for 1800 seconds (30 minutes). Toggle Force stop the nodes (after shutdown time) to send SIGKILL if the node does not stop within this window. No data is lost during a graceful stop.
Applies to: MySQL/MariaDB, Galera Cluster, Group Replication, PostgreSQL/TimescaleDB, MongoDB, Redis, Microsoft SQL Server, Elasticsearch, Valkey, HAProxy, PGBouncer, Keepalived, ProxySQL, Prometheus
- Log in to your ClusterControl GUI → choose a database cluster → Nodes.
- Locate the target node.
- Click Actions (…) → Stop node (or Start node if the node is currently stopped).
- Optionally, configure the Graceful shutdown timeout or enable Force stop the nodes (after shutdown time).
- Confirm the action to proceed.
Stop a MySQL node (e.g., 192.168.40.30:3306) in cluster ID 36:
Start a previously stopped MySQL node:
Stop a PostgreSQL node (e.g., 192.168.40.40:54 32) in cluster ID 37:
Remove node
Removes a node from ClusterControl management. Depending on the selected removal option, this can also stop the service or fully uninstall the software.
Warning
Removing a node is a destructive operation with respect to ClusterControl's awareness of that node. Choose the appropriate removal option carefully.
Removal options:
| Option | Behavior |
|---|---|
| Keep service running | The node is unregistered from ClusterControl but the database or load balancer service continues running on the host. |
| Stop service and keep files untouched | The node is unregistered and the service is stopped. Data files and configuration files are preserved on the host. |
| Stop and uninstall service | The node is unregistered, the service is stopped, and all related software packages are removed using the system package manager. |
Applies to: MySQL/MariaDB, Galera Cluster, Group Replication, PostgreSQL/TimescaleDB, MongoDB, Redis, Microsoft SQL Server, Elasticsearch, Valkey, HAProxy, PGBouncer, Keepalived, ProxySQL, Prometheus
- Log in to your ClusterControl GUI → choose a database cluster → Nodes.
- Locate the node you want to remove.
- Click Actions (…) → Remove node.
- Select the desired removal option from the panel.
- Confirm the action to proceed.
SSH Console
Opens a web-based SSH terminal in a new browser window, allowing you to execute shell commands directly on the node from your browser. The session authenticates as the configured os_user.
Applies to: MySQL/MariaDB, Galera Cluster, Group Replication, PostgreSQL/TimescaleDB, MongoDB, Redis, Microsoft SQL Server, Elasticsearch, Valkey, HAProxy, PGBouncer, Keepalived, ProxySQL, Prometheus
- Log in to your ClusterControl GUI → choose a database cluster → Nodes.
- Locate the target node.
- Click Actions (…) → SSH Console. A new browser tab or window will open with a terminal session on the selected host.
Replication actions
The following actions are specific to nodes that participate in replication topologies. Availability depends on the cluster type and the node's role.
Promote replica
Promotes the selected replica to become the new primary node. If the current primary is healthy, stop application traffic before promoting a replica to prevent data loss. Connections to the existing primary are terminated after a 10-second grace period.
Warning
Toggle Force promotion of replica to ignore errors (such as errant transactions or long-running queries) during promotion. Without this option, ClusterControl aborts the failover if an errant transaction is detected on the replica.
Applies to: MySQL/MariaDB (replication), PostgreSQL/TimescaleDB, Microsoft SQL Server
MySQL/MariaDB and PostgreSQL
- Log in to your ClusterControl GUI → choose a database cluster → Nodes.
- Locate the replica node you want to promote.
- Click Actions (…) → Replication → Promote replica.
- Optionally, enable Force promotion of replica to bypass error checks.
- Confirm the action to proceed.
Redis / Valkey / Microsoft SQL Server
- Log in to your ClusterControl GUI → choose a database cluster → Nodes.
- Locate the replica node.
- Click Actions (…) → Promote replica.
- Confirm the action to proceed.
Promote a MySQL replica (192.168.40.31:3306) in cluster ID 36:
Promote a PostgreSQL replica (192.168.40.41:5432) in cluster ID 37:
Stop/Start replica
Stops or starts the replication thread on the selected replica node without stopping the database service itself. This action is exclusive to replica nodes.
Applies to: MySQL/MariaDB (replication), Galera (if mix with a replica node(s))
- Log in to your ClusterControl GUI → choose a database cluster → Nodes.
- Locate the replica node.
- Click Actions (…) → Replication → Stop replica (or Start replica if the replication thread is currently stopped).
- Confirm the action.
Reset replica
Clears the replication state on the selected replica, causing it to forget its position in the primary's binary log and all connection parameters (primary host, port, user, and password). This is equivalent to running RESET REPLICA ALL on the replica. The replica service must be stopped before this action can be performed.
Note
Toggle Force to ignore errors encountered during the reset.
Applies to: MySQL/MariaDB (replication), Galera (if mix with a replica node(s))
- Log in to your ClusterControl GUI → choose a database cluster → Nodes.
- Locate the replica node (ensure the replica thread is stopped first).
- Click Actions (…) → Replication → Reset replica.
- Optionally, toggle Force to bypass error checks.
- Confirm the action.
Rebuild replica
Rebuilds the selected replica node by re-synchronizing its data from a primary node. This is used when a replica has drifted too far behind, has become corrupted, or needs to be brought back into the replication topology cleanly.
Two methods are available:
- From a primary node – ClusterControl uses Percona XtraBackup (MySQL) or
pg_basebackup(PostgreSQL) to stream a fresh copy of data directly from the primary. This uses the primary's I/O resources during the sync. - From a backup – Toggle Rebuild from a backup and select any PITR-compatible backup from the dropdown. This reduces the impact on the primary during the rebuild.
Applies to: MySQL/MariaDB (replication), PostgreSQL/TimescaleDB, Microsoft SQL Server
- Log in to your ClusterControl GUI → choose a database cluster → Nodes.
- Locate the replica node you want to rebuild.
- Click Actions (…) → Replication → Rebuild replica.
- Choose whether to rebuild from the primary directly or toggle Rebuild from a backup to use an existing PITR-compatible backup.
- If rebuilding from a backup, select the desired backup from the dropdown list.
- Confirm the action to proceed.
Change replication primary
Reconfigures the replication topology so that all replicas point to a different primary node. This action can be initiated from either a replica or a primary node.
Applies to: MySQL/MariaDB (replication), Galera (if mix with a replica node(s)), PostgreSQL/TimescaleDB
- Log in to your ClusterControl GUI → choose a database cluster → Nodes.
- Locate any replica or primary node in the cluster.
- Click Actions (…) → Replication → Change replication primary.
- Select the new primary node from the presented list.
- Confirm the action. ClusterControl will reconfigure all replicas to replicate from the new primary.
Read-only and binary logging
Disable/Enable read-only
Sets or unsets the read-only mode on a database node. When enabled, ClusterControl sets read_only=ON and super_read_only=ON (MySQL 8.0 and later) on the target node.
Applies to: MySQL/MariaDB, Galera Cluster, PostgreSQL/TimescaleDB
- Log in to your ClusterControl GUI → choose a database cluster → Nodes.
- Locate the target node.
- Click Actions (…) → Disable readonly (to enable write access) or Actions (…) → Enable readonly (to set the node as read-only).
- Confirm the action.
Disable/Enable binary logging
Updates the node's configuration to enable or disable MySQL binary logging. Enabling binary logging allows a replica to be added to the node and makes point-in-time recovery (PITR) possible. Disabling binary logging stops any attached replicas and prevents new replicas from being added. A server restart is required for either change to take effect.
Note
Toggle Restart the node to have ClusterControl immediately restart the node after the configuration update, applying the change without a separate step.
Applies to: Galera Cluster
- Log in to your ClusterControl GUI → choose a database cluster → Nodes.
- Locate the Galera node.
- Click Actions (…) → Disable binary logging or Actions (…) → Enable binary logging.
- Optionally, toggle Restart the node to apply the change immediately.
- Confirm the action.
Galera-specific actions
Resync node
Forces a full resync of the selected Galera node. ClusterControl removes all files in the node's data directory (datadir) and triggers a State Snapshot Transfer (SST) from a donor node. If a PITR-compatible full backup exists, ClusterControl will restore from it first to shorten the SST window and increase the probability of an Incremental State Transfer (IST), which is a non-blocking operation.
This action is typically used when a Galera node repeatedly fails to recover or when a filesystem issue is suspected.
Warning
Wait for this operation to complete before starting another Galera node with Initial Start, as concurrent SST operations can disrupt the cluster.
- Log in to your ClusterControl GUI → choose a database cluster → Nodes.
- Locate the Galera node that needs a resync.
- Click Actions (…) → Resync node.
- Confirm the action. ClusterControl will wipe the data directory and initiate an SST or IST from a suitable donor.
Bootstrap Cluster
Bootstraps the Galera cluster from the selected node. ClusterControl stops all currently running Galera nodes before bootstrapping the cluster from the node you choose. Use this action when the entire cluster is down and needs to be started from a known-good node.
Warning
All running Galera nodes will be stopped before the bootstrap begins. Ensure that the selected node has the most up-to-date data (highest seqno) to avoid data loss.
- Log in to your ClusterControl GUI → choose a database cluster → Nodes.
- Locate the Galera node you want to bootstrap from (ideally the node with the highest sequence number).
- Click Actions (…) → Bootstrap Cluster.
- Confirm the action. ClusterControl will stop all running nodes and bootstrap the cluster from the selected node.
MongoDB-specific actions
Step down node
Steps down the selected MongoDB primary, causing it to transition to a secondary and become ineligible for election as primary for a configurable number of seconds. The remaining voting members of the replica set will elect a new primary, excluding the stepped-down node for the specified duration.
Applies to: MongoDB (replica set primary)
- Log in to your ClusterControl GUI → choose a database cluster → Nodes.
- Locate the MongoDB primary node.
- Click Actions (…) → Step down node.
- Specify the number of seconds during which the node is ineligible for re-election.
- Confirm the action.
Freeze node
Prevents the selected MongoDB replica set member from seeking election for a specified number of seconds. To unfreeze the node before the duration elapses, issue the command again with a value of 0 seconds.
Applies to: MongoDB (replica set members)
- Log in to your ClusterControl GUI → choose a database cluster → Nodes.
- Locate the MongoDB node.
- Click Actions (…) → Freeze node.
- Enter the number of seconds to freeze the node.
- Confirm the action.
PostgreSQL-specific actions
Configure WAL
The Write-Ahead Log (WAL) is PostgreSQL's REDO log. WAL records all changes made to the database and is essential for replication, online backup, and point-in-time recovery (PITR). Enabling WAL archiving prevents the primary from recycling WAL segments before replicas have applied them, which would otherwise force a full replica rebuild.
Warning
Changing the WAL archive mode or directory causes the loss of the previously collected WAL archive, eliminating the ability to perform point-in-time recovery (PITR) for any prior time frames.
WAL configuration options:
| Option | Description |
|---|---|
| Archive Mode | Off – WAL logs are not archived; PITR is not possible. On – WAL logs are archived only when the node is in primary mode. Always – WAL logs are archived regardless of the node's role (primary or replica). |
| Compressed WAL Archive | Enables compression for archived WAL logs. Enabled by default. |
| Custom WAL Archive Directory | Path to the WAL archive directory. Defaults to /var/lib/pgsql/13/wal_archive if left empty. |
| Nodes | WAL archiving can be configured on all database nodes simultaneously or on an individual node. |
Applies to: PostgreSQL/TimescaleDB
- Log in to your ClusterControl GUI → choose a database cluster → Nodes.
- Locate the PostgreSQL node.
- Click Actions (…) → Configure WAL. This opens the WAL configuration panel.
- Set the Archive Mode, toggle Compressed WAL Archive as desired, and specify a Custom WAL Archive Directory if needed.
- Select whether the change applies to All nodes or the individual node.
- Confirm the action to apply the WAL configuration.
Synchronous replication
Enables or disables synchronous streaming replication between the primary and the selected replica node. When enabled, the primary waits for the replica to confirm receipt of WAL data before acknowledging a transaction commit. Synchronous replication can be enabled per individual replica node but carries a notable performance overhead.
Applies to: PostgreSQL/TimescaleDB (replica nodes only)
- Log in to your ClusterControl GUI → choose a database cluster → Nodes.
- Locate the PostgreSQL replica node.
- Click Actions (…) → Synchronous Replication.
- Toggle synchronous replication on or off for the selected replica.
- Confirm the action.
ProxySQL-specific actions
Synchronize Instances
Synchronizes the ProxySQL configuration across multiple ProxySQL instances to ensure they remain identical. This operation overwrites the target's existing configuration.
Two synchronization modes are available:
- Synchronize existing instances – Exports the configuration from a source ProxySQL instance and imports it to one or more target instances.
- Import Configuration file – Restores a previously exported ProxySQL configuration backup to the selected instance.
Applies to: ProxySQL
- Log in to your ClusterControl GUI → choose a database cluster → Nodes.
- Locate the ProxySQL node.
- Click Actions (…) → Synchronize Instances.
- Choose between Synchronize existing instances or Import Configuration file.
- Select the source instance or the configuration backup file as appropriate.
- Confirm the action.
Export configuration
Exports the full ProxySQL configuration from the selected instance to a backup file. The exported backup can be imported to any ProxySQL instance using the Synchronize Instances → Import Configuration file option.
The following configuration data is included in the export:
- Query Rules
- Host Groups and Servers
- Users and corresponding MySQL users
- Global Variables
- Scheduler
proxysql.cnf
Applies to: ProxySQL
- Log in to your ClusterControl GUI → choose a database cluster → Nodes.
- Locate the ProxySQL node.
- Click Actions (…) → Export configuration.
- Confirm the action. ClusterControl will generate and download the configuration backup file.
Schedule maintenance for a node
Schedules a maintenance window for an individual node, suppressing alarms and notifications for the node during the specified period. While in maintenance mode, ClusterControl will not generate alerts for node events (e.g., threshold breaches, health check failures).
For full details on configuring, checking, and deactivating maintenance mode, see Maintenance.
Attention
If automatic node recovery is enabled, ClusterControl will still attempt to recover the node regardless of maintenance mode status. Disable node recovery before starting maintenance if you do not want ClusterControl to interfere.
Applies to: MySQL/MariaDB, Galera Cluster, PostgreSQL/TimescaleDB, MongoDB, Redis, Microsoft SQL Server, Elasticsearch, Valkey, HAProxy, ProxySQL, Prometheus
Schedule maintenance:
- Log in to your ClusterControl GUI → choose a database cluster → Nodes.
- Locate the target node.
- Click Actions (…) → Schedule maintenance.
- Specify the maintenance reason, define the duration, or set a custom start and end date/time.
- Confirm to activate the maintenance window.
Manage or stop active maintenance:
- Log in to your ClusterControl GUI → choose a database cluster → Nodes.
- Locate the node currently in maintenance (a blue wrench icon is shown next to its status).
- Click Actions (…) → Maintenance → Manage scheduled maintenance to review the schedule details or delete it.
- To stop an active maintenance window immediately, click Actions (…) → Maintenance → Stop current maintenance and confirm.
Schedule a one-day maintenance window for PostgreSQL node 192.168.40.40:5432 (ClusterControl expects UTC time):
s9s maintenance \
    --create \
    --nodes=192.168.40.40:5432 \
    --begin=2024-05-15T05:44:55.000Z \
    --end=2024-05-16T05:44:55.000Z \
    --reason='Upgrading RAM' \
    --batch
Schedule maintenance for a MySQL node 192.168.40.30:3306 starting tomorrow for one hour:
s9s maintenance \
    --create \
    --nodes=192.168.40.30:3306 \
    --begin="$(date --date='now + 1 day' --utc '+%Y-%m-%d %H:%M:%S')" \
    --end="$(date --date='now + 1 day + 1 hour' --utc '+%Y-%m-%d %H:%M:%S')" \
    --reason="OS patching"
List all nodes currently under a maintenance period:
Delete (stop) a maintenance period by UUID: