ClusterControl MCP
The ClusterControl MCP Server is a bridge between your AI assistant and your databases. You type what you need in plain English or other languages, and it figures out the rest. No dashboards to click through, no commands to memorize. It works with AI tools like Claude Desktop, Claude Code, and OpenAI Codex, and supports more than 50 actions and counting, covering backups, cluster management, user accounts, and performance monitoring. It works with MySQL, MariaDB, PostgreSQL, MongoDB, SQL Server, and TimescaleDB.
How It Works
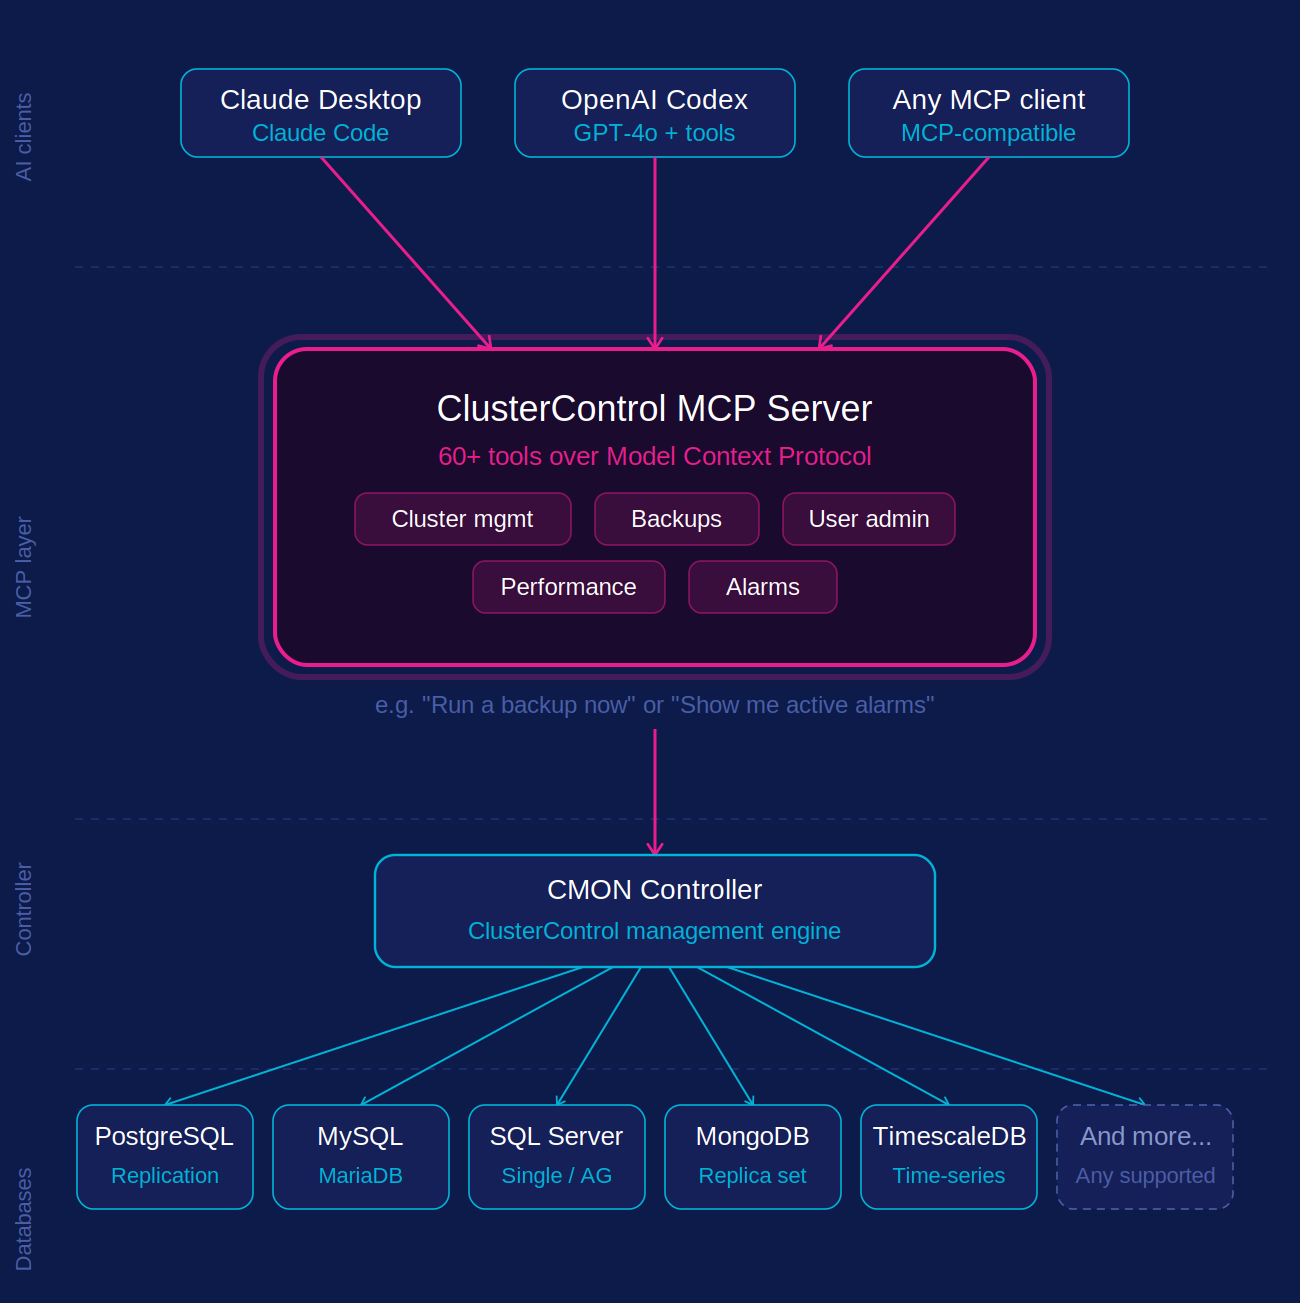
The diagram below shows how everything connects. Your AI tool sits at the top. When you type a request, it goes through the MCP Server, which translates it into the right action and passes it to the CMON Controller. The controller then talks to whichever database cluster you are working with.
Before you get started, make sure you have the following in place:
- A running ClusterControl installation with CMON Controller accessible over the network (CMON controller reachable on port 9501)
- A CMON user account with access to the clusters you want to query
- An MCP-compatible AI client such as Claude Desktop, Claude Code, or OpenAI Codex
Once you have confirmed all the requirements above are in place, you are ready to install and configure the ClusterControl MCP Server. Packages are published to the Severalnines repository alongside other ClusterControl components.
The binary installs to /usr/bin/cmon-mcp. A systemd service unit and default configuration file are also installed:
/etc/systemd/system/cmon-mcp.service: service unit/etc/default/cmon-mcp: environment file for credentials and transport options
Configuration
The ClusterControl MCP Server is configured through the /etc/default/cmon-mcp file on your CMON host. Open the file and edit the values to match your environment:
Configuration Parameters
CMON Controller Connection
| Parameter | Description | Example |
|---|---|---|
CMON_ENDPOINT |
The URL of your CMON Controller API | https://127.0.0.1:9501 |
CMON_USERNAME |
The ClusterControl username | admin |
CMON_PASSWORD |
Password for the user (leave empty if using key auth) | severalNINES999 |
CMON_KEY_FILE |
Path to RSA private key (alternative to password) | /etc/clustercontrol/id_rsa |
You can authenticate using either a password or an RSA key file, not both at the same time. If CMON_PASSWORD is set, leave CMON_KEY_FILE empty, and vice versa.
The CMON user you specify here is the identity the MCP Server uses for every action it performs. We recommend creating a dedicated CMON user with only the privileges your team actually needs and please avoid reusing your main admin account.
MCP Server
| Parameter | Description | Example |
|---|---|---|
MCP_BIND_ADDRESS |
Address and port the MCP Server listens on | 0.0.0.0:3000 |
MCP_BASE_URL |
Public URL that AI clients use to connect | http://your-cc-host:3000 |
MCP_AUTH_TOKEN |
Bearer token to secure all incoming connections | your-strong-random-token |
For MCP_BIND_ADDRESS, use 127.0.0.1:3000 if you only need local access, or 0.0.0.0:3000 to allow remote AI clients to connect.
MCP Transport Endpoints
The MCP Server exposes two transports on the same port:
/sse and /message is SSE transport, used by Claude Desktop and Claude Code. /mcp is Streamable HTTP transport, used by OpenAI Codex
Complete Configuration Example
The following shows the ClusterControl MCP Server example configuration after it has been set up through the /etc/default/cmon-mcp file on your CMON host.
# CMON Controller connection
CMON_ENDPOINT=https://127.0.0.1:9501
CMON_USERNAME=admin
CMON_PASSWORD='severalNINES999'
# RSA key auth alternative (leave CMON_PASSWORD empty if using this):
# CMON_KEY_FILE=/etc/clustercontrol/id_rsa

# MCP Server
MCP_BIND_ADDRESS=0.0.0.0:3000
MCP_BASE_URL=http://your-cc-host:3000
MCP_AUTH_TOKEN=
Generating a Secure Token
It is strongly recommended to protect your MCP Server with a bearer token, especially when MCP_BIND_ADDRESS is set to 0.0.0.0. Generate one with:
Copy the output and set it as the value of MCP_AUTH_TOKEN.
Starting the Service
Save the configuration file, then restart the service:
Confirm it started successfully:
You should see output confirming the MCP Server is running and listening on the address defined in MCP_BIND_ADDRESS.
Connecting to AI Clients
Once the MCP Server is running, you need to register it with your AI client. The steps differ slightly depending on which client you use.
Claude Desktop
Open your Claude Desktop configuration file:
- macOS:
~/Library/Application Support/Claude/claude_desktop_config.json - Windows:
%APPDATA%\Claude\claude_desktop_config.json
Add the following entry under mcpServers so that it looks like this :
{
  "mcpServers": {
    "clustercontrol": {
      "type": "sse",
      "url": "http://your-cc-host:3000/sse",
      "headers": {
        "Authorization": "Bearer your-auth-token"
      }
    }
  }
}
Alternatively, you can use mcp-remote with Node.js installed on your environment with the following JSON configuration:
{
  "mcpServers": {
    "clustercontrol": {
      "command": "npx",
      "args": [
        "mcp-remote",
        "http://your-cc-host:3000/sse",
        "--allow-http",
        "--header",
        "Authorization: Bearer your-auth-token"
      ]
    }
  }
}
Save the file and restart Claude Desktop. You should see clustercontrol appear in the File → Settings → developer → Local MCP servers panel like this after restart Claude Desktop.

Claude Code
Run the following command in your terminal:
claude mcp add clustercontrol -- cmon-mcp \
  -endpoint https://your-cc-host:9501 \
  -username admin \
  -password your-password
To verify it was added:
OpenAI Codex
Add the MCP Server to your Codex tool configuration using the /mcp endpoint:
{
  "tools": [
    {
      "type": "mcp",
      "server_label": "clustercontrol",
      "server_url": "http://your-cc-host:3000/mcp",
      "headers": {
        "Authorization": "Bearer your-auth-token"
      },
      "require_approval": "never"
    }
  ]
}
Verifying the Connection
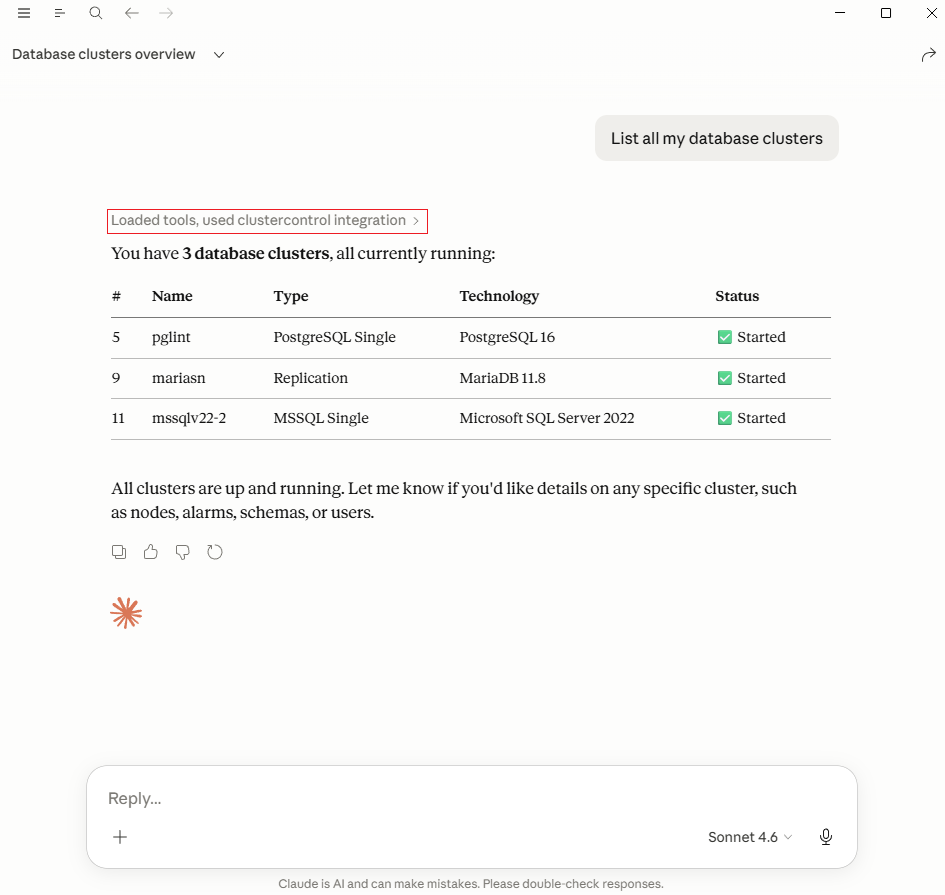
Once connected, ask your AI assistant the following to confirm everything is working:
If the setup is correct, it will return the list of clusters managed by your ClusterControl instance.