Redundancy & High Availability
ClusterControl can be deployed in a couple of different ways for redundancy and high availability:
- Secondary standby - Acts as a hot standby in case the primary ClusterControl host goes down.
- CMON Controller Pool - GA Release in ClusterControl 2.4.0. A scalable pool of controllers designed for demanding, multi-site and high-growth environments.
- ClusterControl Replication - Introduced in ClusterControl 2.4.0. High-availability deployment using replication with a primary-secondary architecture.
Secondary Standby
It is possible to have more than one ClusterControl server to monitor the same cluster. This is useful if you have a multi-datacenter cluster and you may need to have ClusterControl on the remote site to monitor and manage the alive nodes if the connection between them goes down. However, ClusterControl servers must be configured to be working in active-passive mode to avoid race conditions when recovering failed nodes or clusters.
In the active mode, the ClusterControl node acts as a primary controller, where it performs automatic recovery and management activities. Therefore the primary controller Cluster/Node Auto Recovery must be set to on. The secondary ClusterControl node however must be configured with Cluster/Node Auto Recovery turned off.
Installing standby server
The steps described in this section must be performed on the secondary ClusterControl server.
- Install ClusterControl as explained on the Quickstart.
-
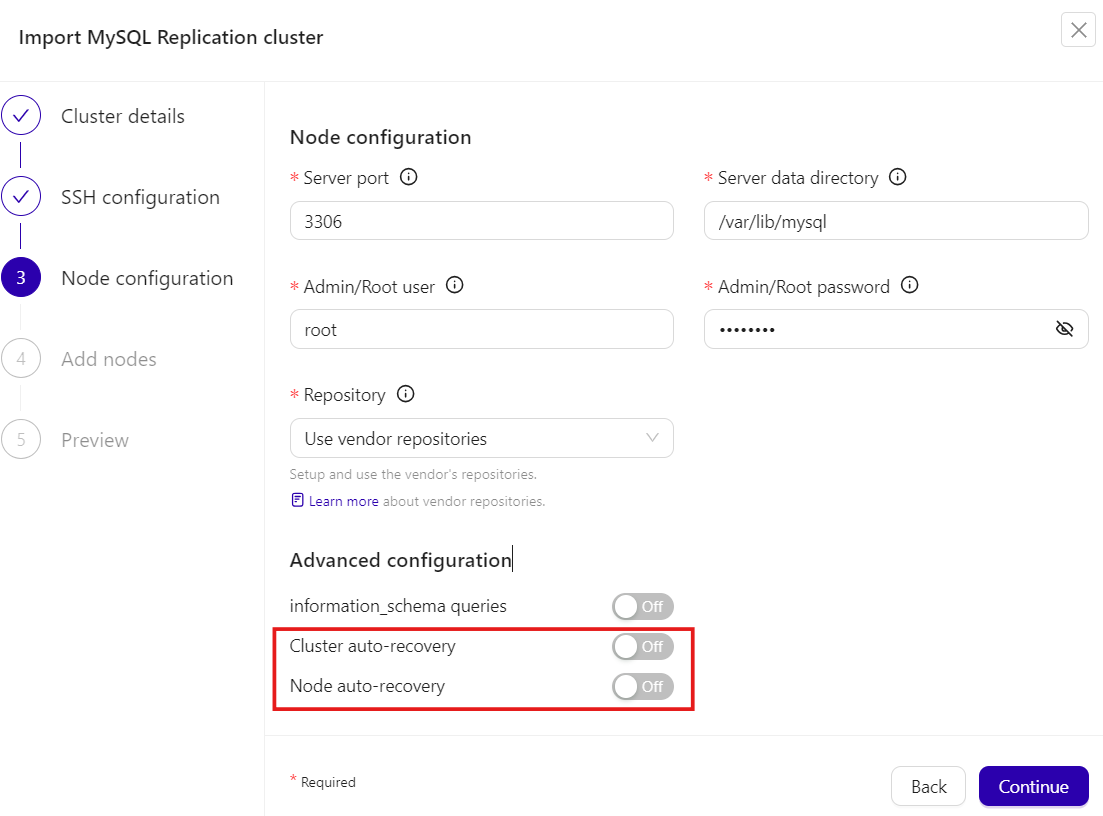
Import the same cluster via ClusterControl GUI → Deploy a cluster → Import a database cluster. Ensure to toggle off Cluster auto-recovery and Node auto-recovery in the Node configuration section. Repeat this step if you want to import more than one cluster.
Example
-
Set up the cluster configuration accordingly to follow similar settings with the primary ClusterControl (backup schedules, alerting configuration, user roles, etc).
At this point, the architecture should be looking like this:
flowchart TD
    U[/DBA/<br>SysAdmin/] --> A[ClusterControl A<br><i><strong>Active</strong></i><br>#40;auto-recovery enabled#41;]
    B[ClusterControl B<br><i><strong>Standby</strong></i><br>#40;auto-recovery disabled#41;]
    A ==> |manage & monitor|D[[Database/<br>Load balancer nodes]]
    B ==> |monitor|D[[Database/<br>Load balancer nodes]]
Nothing should be performed on the primary side. The primary ClusterControl server shall perform automatic recovery in case of node or cluster failure. Use the secondary ClusterControl server for monitoring purposes only. For management and recovery purposes like rebuilding the replication, resyncing the node, backup and restore, perform those activities on the primary ClusterControl server.
Info
You don't need an additional ClusterControl license for multiple ClusterControl instances. You can apply the same license as your primary ClusterControl server onto the secondary server. The license is bounded on the number of database/load balancer nodes it manages.
Activating the secondary standby
If you want to make the standby server runs in the active mode, you must do the following:
-
If the primary ClusterControl server is still alive, stop the primary ClusterControl controller services, or shutdown the server. To stop all ClusterControl processes, run the following command on the primary ClusterControl server:
-
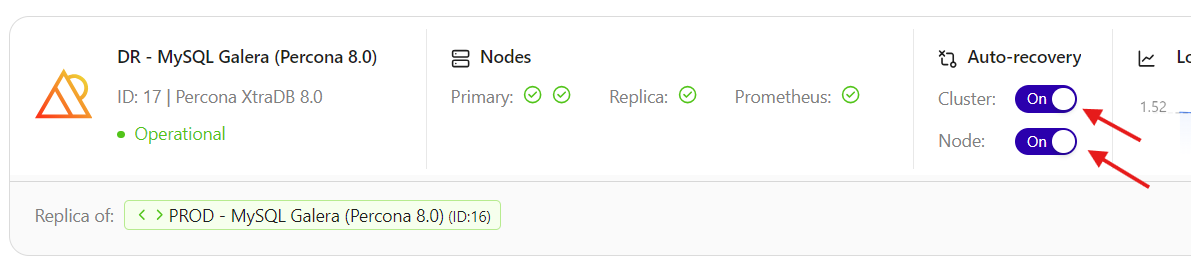
Toggle on Cluster auto-recovery and Node auto recovery on the secondary ClusterControl server.
Example
At this point, the standby server has taken over the primary role and you can perform the management activities on the database nodes or clusters. We can visualize the current topology as below:
flowchart TD
    A[ClusterControl A<br><i><strong>Offline</strong></i><br>#40;auto-recovery disabled#41;]
    U[/DBA/<br>SysAdmin/] --> B[ClusterControl B<br><i><strong>Active</strong></i><br>#40;auto-recovery enabled#41;]
    A ==> D[[Database/<br>Load balancer nodes]]
    B ==> |manage & monitor|D[[Database/<br>Load balancer nodes]]
Attention
Do not let two or more ClusterControl instances perform automatic recovery to the same cluster at a given time.
CMON Controller Pool
CMON Controller Pool is a scalable solution that enables multiple ClusterControl controllers (CMON services) to work together as a pool, sharing the workload of managing database clusters. Instead of relying on a single controller to manage all clusters, controller pool distributes cluster load across multiple controller instances, improving performance, scalability and ensuring high availability.
This work improves scalability, resilience, and day-2 operations when managing many clusters, and is designed for demanding, multi-site and high-growth environments.
Key Features
- Activate/Deactivate CMON Controller Pool - Enable or disable on an existing controller, allowing gradual adoption and rollback
- Horizontal Scaling - Automatically add and remove controllers based on workload
- Shared CMON Configurations - Using NFS for consistent configuration across the pool
- Integrated UI/UX - Seamless interface for enabling and managing CMON Controller Pool
Enabling controller pool
-
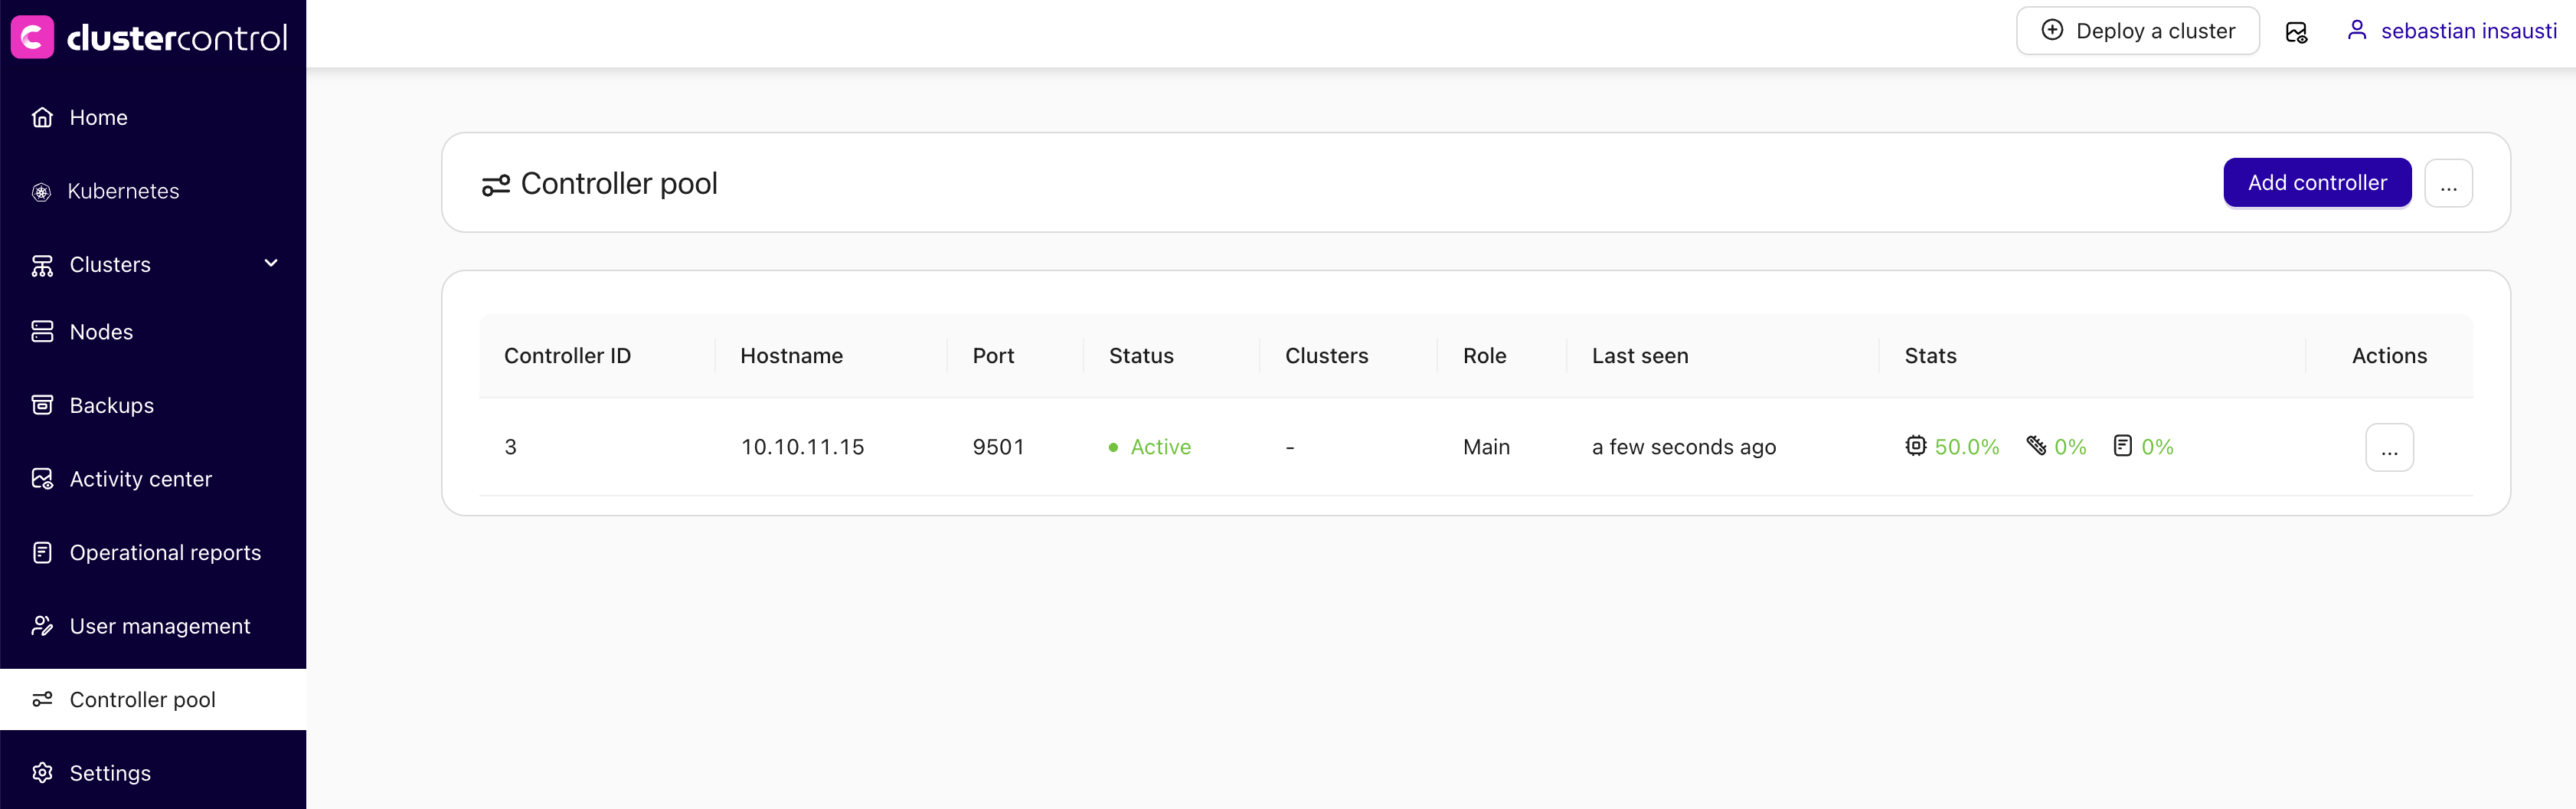
Go to ClusterControl GUI → Controller pool (sidebar) → Restart CMON in pool mode.
-
Define the network mask that is allowed to connect to MySQL/PostgreSQL nodes with CIDR notation: ip/fixed_bits (e.g.
192.168.1.0/24,10.10.0.0/16). -
Press on the Enable button.
This will restart the CMON service to apply the changes.
Rollback
If you want to disable this feature and go back to the single mode, you can go to ClusterControl GUI → Controller pool (sidebar) → Actions → Restart CMON in single mode.
Adding more controllers
You can add more controllers into the pool by clicking on the Add controller button and follow the deployment wizard accordingly.
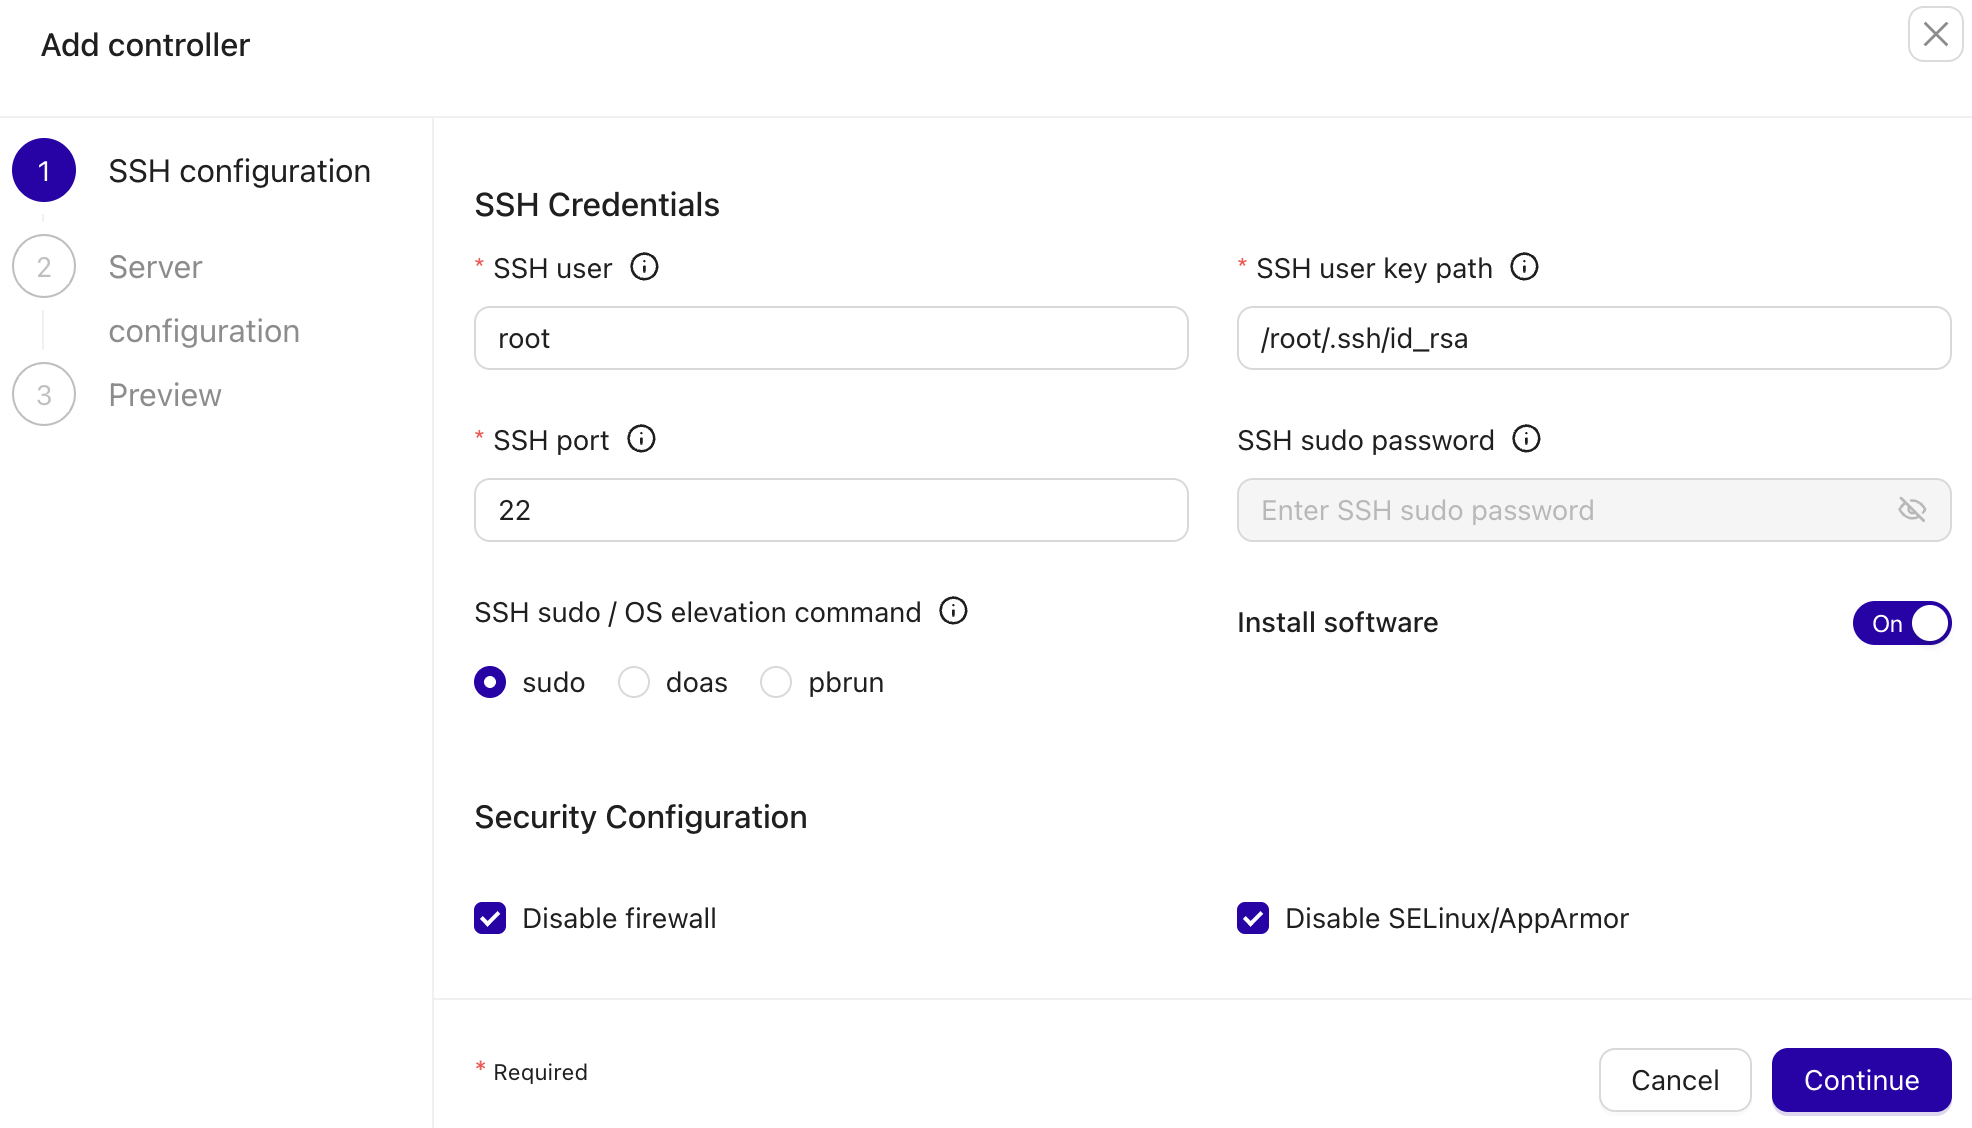
You have to specify the SSH information to access the new controller and if you want ClusterControl to install the software there.
In the next step, you need to add the new server information like server address (IP address or hostname), repository to be used during the deployment, and the RPC port for the new controller (optional).
This will install and configure a new ClusterControl controller and add it to the pool.
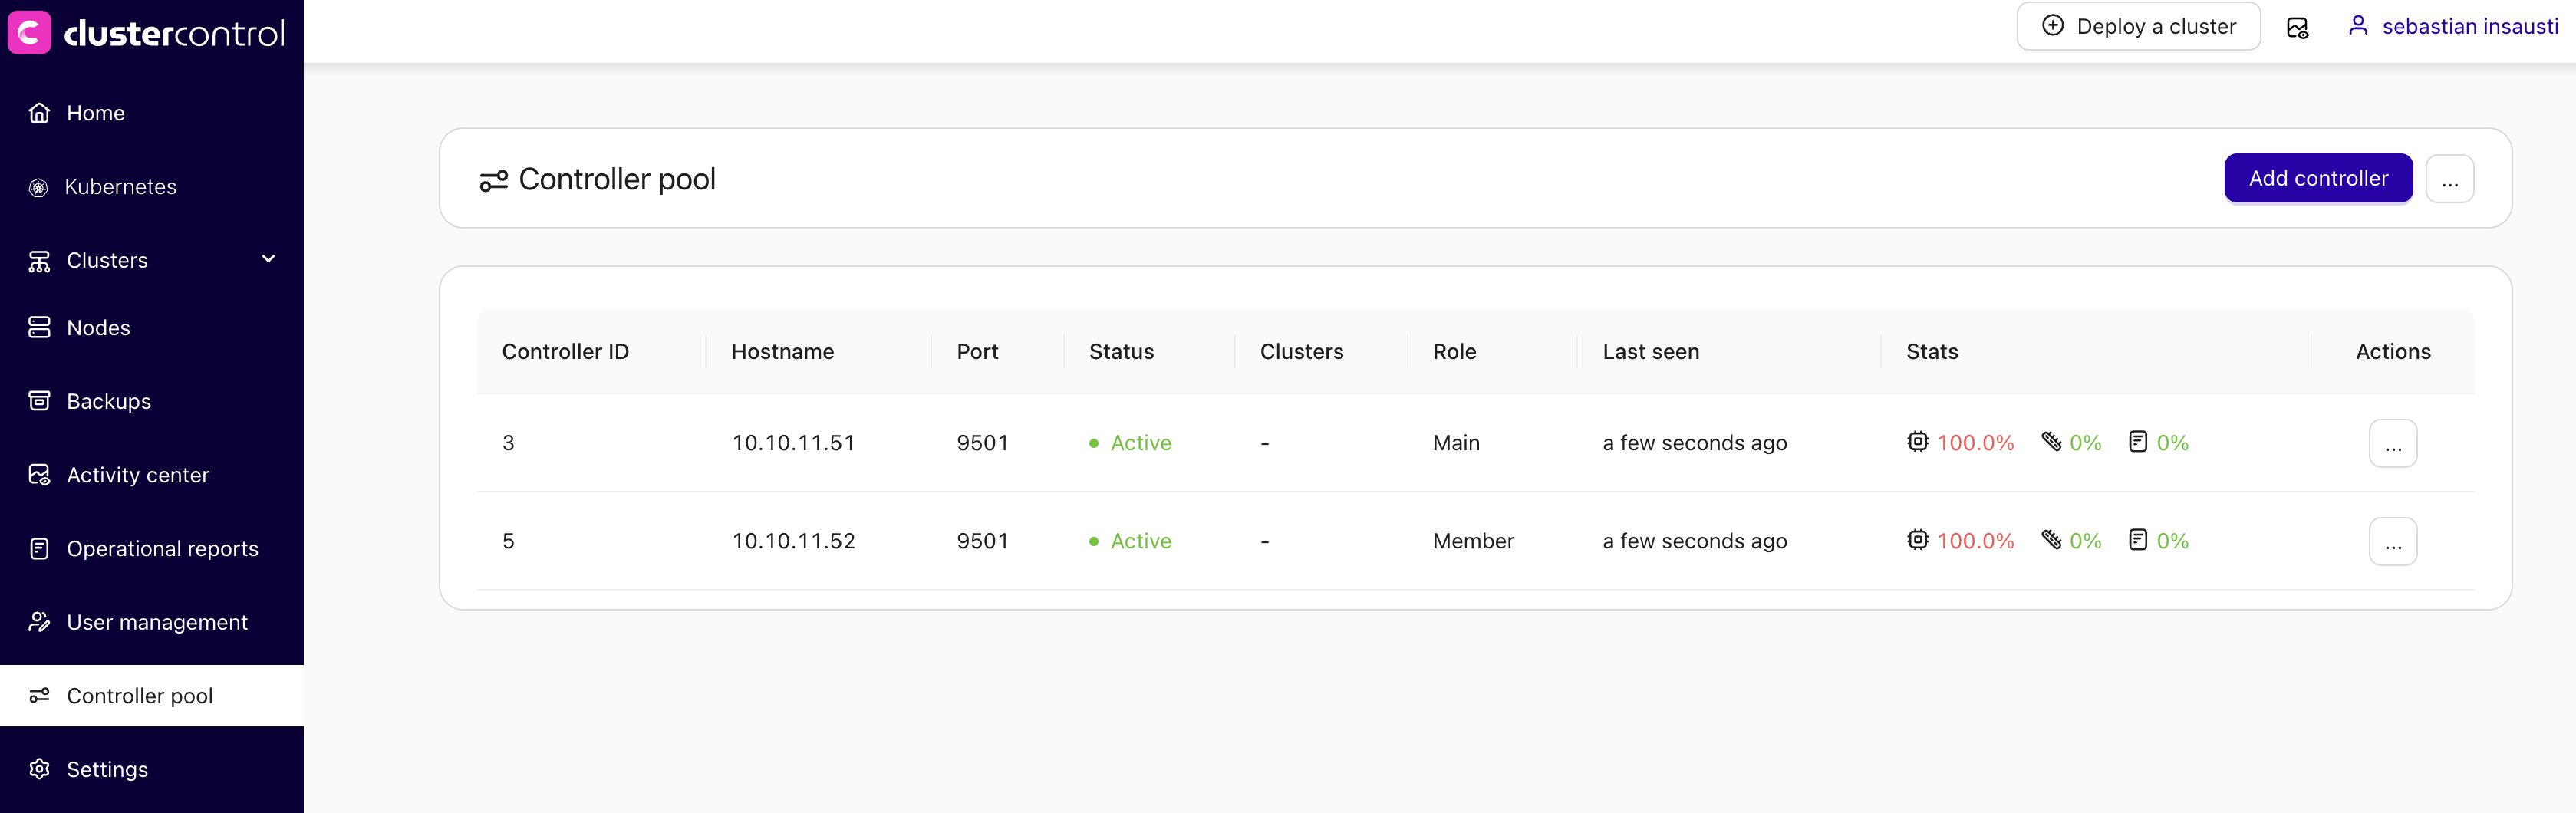
Removing controllers
To remove a controller, simply go to Actions → Remove and ClusterControl GUI will send a signal to terminate the chosen CMON process.
Attention
The controller must be stopped to be removed.
ClusterControl Replication
ClusterControl Replication provides a high-availability solution for ClusterControl using replication with open-source tools. This deployment uses a primary-secondary architecture where only one ClusterControl instance is active at a time, with the other on cold standby.
Key Components
- MySQL Replication - Provides CMON database redundancy using primary-replica topology
- File Syncing - Uses rsync and lsyncd for one-way synchronization of ClusterControl files
- Virtual IP (VIP) - Managed by Keepalived for seamless client connectivity during failover
- External Prometheus - Must be deployed on a separate host (not co-located with ClusterControl)
Architecture
The active node holding the VIP is:
- The primary ClusterControl server
- The primary MySQL instance with read-write access
- The source for file syncing operations
- Configured to use VIP for outbound connections
flowchart TD
    U[/DBA/<br>SysAdmin/] --> V((VIP))
    V --> |active|A[ClusterControl A<br>#40;**primary**#41;] -..-> |replicate|B[ClusterControl B<br>#40;**secondary**#41;]
    V -..-> |standby|B
    A & B --> C([Prometheus])
    A ==> |outbound <br>via VIP|V ==> D[[Database/<br>Load balancer nodes]]
    subgraph "ClusterControl Replication"
        A
        B
    end
Known limitations
Please understand the following limitations and restrictions with this setup:
- Prometheus is a single point of failure. You can achieve redundancy for this component by implementing remote write to another Prometheus server. This is out of the scope of this article.
- The managed cluster database backups should NOT be stored on the ClusterControl server. You have other options like store backup on the database node, or upload backups to cloud (optionally choose "Delete after upload"). It is also possible to store the backups on ClusterControl node using shared storage (NFS/CIFS/SMB) mounted on the same path on both cc1 and cc2.
- This setup relies on virtual IP address, provided by Keepalived which only works on Layer 2 broadcast domain, recommended for LAN. It can be used across WAN only if L2 connectivity is extended (e.g., VPLS or bridging), though it is not recommended for high-latency connections.
Requirements
The following requirements must be met to deploy ClusterControl Replication:
- 3 nodes minimum:
- ClusterControl A (cc1) - Primary node
- ClusterControl B (cc2) - Secondary node
- Prometheus (prom) - External monitoring node
- Virtual IP address (e.g.,
192.168.73.200) - MySQL 8+ with CLONE plugin enabled
- VRRP support between ClusterControl nodes (Layer 2 connectivity)
- Shared SSH private key between nodes
Deployment steps
This guide uses the following example configuration:
- VIP: 192.168.73.200
- cc1 (primary): 192.168.73.201
- cc2 (secondary): 192.168.73.202
- prom (Prometheus): 192.168.73.209
Info
Adapt all IP addresses, hostnames, and interface names to match your environment.
-
Host Preparation (All Nodes)
1.1. Configure
/etc/hostson all nodes (cc1, cc2, and prom):tee -a /etc/hosts <<EOF 192.168.73.200 ccvip.local ccvip 192.168.73.201 cc1.local cc1 192.168.73.202 cc2.local cc2 192.168.73.209 prom.local prom EOF1.2. Generate SSH keys on cc1:
1.3. Prepare root SSH access on all nodes (cc2 and prom):
mkdir -p /root/.ssh
chmod 700 /root/.ssh
vi /root/.ssh/id_rsa    # copy the content of /root/.ssh/id_rsa on cc1 here
chmod 600 /root/.ssh/id_rsa
1.4. Copy the public key to all nodes:
# Get the public key
cat /root/.ssh/id_rsa.pub

# On each node (cc1, cc2, prom), add it to authorized_keys
tee -a /root/.ssh/authorized_keys <<EOF
# paste public key here
EOF
1.5. Configure SSH to allow root login with key:
sed -i 's/^#PermitRootLogin.*/PermitRootLogin prohibit-password/' /etc/ssh/sshd_config
systemctl restart sshd
Verify passwordless SSH from cc1 to all nodes:
-
Keepalived Installation (cc1 and cc2)
Keepalived provides a virtual IP service and it will be used as the single-endpoint access for ClusterControl services. The ClusterControl GUI will be accessible via VIP, for example: https://192.168.73.200/.
2.1. Install Keepalived and iptables on both ClusterControl nodes:
2.2. Enable non-local IP binding:
2.3. Create the SNAT management script
/etc/keepalived/manage_snat.shon both cc1 and cc2 to force outbound connections to use the VIP:tee /etc/keepalived/manage_snat.sh <<'EOF' #!/bin/bash ## Change me VIP='192.168.73.200' INTERFACE='eth0' ## TYPE=$1 NAME=$2 STATE=$3 case $STATE in "MASTER") iptables -t nat -A POSTROUTING -o $INTERFACE -j SNAT --to-source $VIP ;; "BACKUP"|"FAULT") iptables -t nat -D POSTROUTING -o $INTERFACE -j SNAT --to-source $VIP ;; esac EOFAttention
Adjust
INTERFACE='eth0'andVIP='192.168.73.200'to match your network interface and virtual IP address. Check withip aorifconfig.2.4. Make the script executable:
2.5. Configure Keepalived on cc1 (priority 105):
tee /etc/keepalived/keepalived.conf <<'EOF'
vrrp_script check_cmon {
script "/usr/bin/killall -0 cmon"
interval 2
weight 2
}
vrrp_instance VI_1 {
state BACKUP
nopreempt
interface eth0
virtual_router_id 51
priority 105
advert_int 1
authentication {
    auth_type PASS
    auth_pass 1113
}
virtual_ipaddress {
    192.168.73.200   # the VIP
}
track_script {
    check_cmon
}
notify /etc/keepalived/manage_snat.sh
}
EOF
2.6. Configure Keepalived on cc2 (priority 100):
tee /etc/keepalived/keepalived.conf <<'EOF'
vrrp_script check_cmon {
script "/usr/bin/killall -0 cmon"
interval 2
weight 2
}
vrrp_instance VI_1 {
state BACKUP
nopreempt
interface eth0
virtual_router_id 51
priority 100
advert_int 1
authentication {
    auth_type PASS
    auth_pass 1113
}
virtual_ipaddress {
    192.168.73.200   # the VIP
}
track_script {
    check_cmon
}
notify /etc/keepalived/manage_snat.sh
}
EOF
Attention
Change the
interfaceandvirtual_ipaddressvalues accordingly.2.7. Ensure Keepalived is stopped on cc1 and cc2 and we will start Keepalived later, after we have configured file replication:
-
Install ClusterControl
3.1. As root, install ClusterControl on cc1:
wget https://severalnines.com/downloads/cmon/install-cc
chmod +x install-cc
./install-cc    # follow the installation wizard
3.2. Stop all ClusterControl services and MySQL, and disable cmon on boot:
systemctl stop cmon cmon-cloud cmon-ssh cmon-events cmon-proxy kuber-proxy
systemctl stop mysql
systemctl disable cmon
Repeat steps 3.1 and 3.2 on cc2. Make sure you stop ClusterControl services and MySQL.
3.3. On cc1 and cc2, set the VIP as the hostname value inside
/etc/cmon.cnf:3.4. On cc1 and cc2, add the following line to define the Prometheus host 192.168.73.209 inside
/etc/cmon.cnf:3.5. On cc1 and cc2, configure
/etc/default/cmonas below to allow ClusterControl RPC interface to listen to all IP addresses (including VIP): -
Configure MySQL replication for CMON DB
4.1. Stop MySQL service on both cc1 and cc2 if you haven't done so:
4.2. On both cc1 and cc2, comment the following line inside
/etc/mysql/my.cnf(because we want to enable binlog for replication):4.3. On cc1, configure MySQL configuration file,
/etc/mysql/my.cnfas below under the[mysqld]section:# add the following lines if not exist server-id = 1 log_bin = mysql-bin binlog_format = ROW gtid_mode = ON enforce_gtid_consistency= ON log_slave_updates = ON binlog_expire_logs_seconds = 604800 bind-address = 0.0.0.0 # CLONE plugin plugin-load-add = mysql_clone.so clone = FORCE_PLUS_PERMANENT clone_valid_donor_list = 'cc1:3306,cc2:3306'4.4. On cc2, configure MySQL configuration file,
/etc/mysql/my.cnfas below under the[mysqld]section (the difference isserver-id):# add the following lines if not exist server-id = 2 log_bin = mysql-bin binlog_format = ROW gtid_mode = ON enforce_gtid_consistency= ON log_slave_updates = ON binlog_expire_logs_seconds = 604800 bind-address = 0.0.0.0 # CLONE plugin plugin-load-add = mysql_clone.so clone = FORCE_PLUS_PERMANENT clone_valid_donor_list = 'cc1:3306,cc2:3306'4.5. Start MySQL on cc1 and cc2, make sure MySQL is operational after restart:
4.6. Configure MySQL on cc1 as primary:
-- mysql on cc1
CREATE USER 'clone'@'%' IDENTIFIED BY 'Secur3_p4ssword';
GRANT BACKUP_ADMIN, CLONE_ADMIN ON *.* TO 'clone'@'%';
-- for repl user, we use mysql_native_password plugin to simplify replication configuration
CREATE USER 'repl'@'%' IDENTIFIED WITH 'mysql_native_password' BY 'Secur3_p4ssword';
GRANT REPLICATION SLAVE, REPLICATION CLIENT ON *.* TO 'repl'@'%';
4.7. On cc2, initiate the clone to sync MySQL data from cc1:
4.8. On cc2, start the MySQL replication and check the status:
-- mysql on cc2
CHANGE REPLICATION SOURCE TO
SOURCE_HOST = 'cc1',
SOURCE_USER = 'repl',
SOURCE_PASSWORD = 'Secur3_p4ssword',
SOURCE_AUTO_POSITION = 1;
4.9. Start the replication and check the replication status:
Make sure you see the following:
The above means cc2 MySQL is actively replicating from cc1.
4.9. On cc2, configure MySQL to be a read-only replica to protect against accidental writes:
-
Configure file syncing
5.1. Install rsync and lsyncd on cc1 and cc2:
5.2. Create the lsyncd configuration directory:
5.3. Add the following line into
/etc/lsyncd/lsyncd.conf.luaon cc1:settings { logfile = "/var/log/lsyncd.log", statusFile = "/var/log/lsyncd.status", statusInterval = 10 } -- 1. Sync for directories (Add trailing slashes to source) local sync_dirs = { "/var/lib/cmon/", "/etc/cmon.d/", "/root/.s9s/", "/var/www/html/clustercontrol-mcc/", "/var/www/html/cmon-repos/", "/usr/share/ccmgr/" } for _, path in ipairs(sync_dirs) do sync { default.rsync, source = path, -- The trailing slash here means "sync contents" target = "cc2:" .. path, rsync = { archive = true, compress = true } } end -- 2. Sync for the individual file /etc/s9s.conf sync { default.rsync, source = "/etc/", target = "cc2:/etc/", rsync = { archive = true, _extra = { "--include=/cmon.cnf", "--include=/cmon-events.cnf", "--include=/s9s.cnf", "--exclude=*" } } }5.4. Add the following line into
/etc/lsyncd/lsyncd.conf.luaon cc2:settings { logfile = "/var/log/lsyncd.log", statusFile = "/var/log/lsyncd.status", statusInterval = 10 } -- 1. Sync for directories (Add trailing slashes to source) local sync_dirs = { "/var/lib/cmon/", "/etc/cmon.d/", "/root/.s9s/", "/var/www/html/clustercontrol-mcc/", "/var/www/html/cmon-repos/", "/usr/share/ccmgr/" } for _, path in ipairs(sync_dirs) do sync { default.rsync, source = path, -- The trailing slash here means "sync contents" target = "cc1:" .. path, rsync = { archive = true, compress = true } } end -- 2. Sync for the individual file /etc/s9s.conf sync { default.rsync, source = "/etc/", target = "cc1:/etc/", rsync = { archive = true, _extra = { "--include=/cmon.cnf", "--include=/cmon-events.cnf", "--include=/s9s.cnf", "--exclude=*" } } }5.5. Start Keepalived service on cc1 only, so VIP will be available on cc1 before we can start ClusterControl services:
5.6. Start ClusterControl services on cc1 only:
5.7. Ping ClusterControl RPC interface for
cid 0on cc1 only, make sure you get the "Ok" reply:5.8. Start the lsyncd service on cc1 only and make sure it is running (DO NOT START it on cc2):
5.9. We will intentionally set lsyncd to NOT start on boot for both cc1 and cc2:
5.10. Monitor the file syncing operation. Make sure you see something similar to below:
$ tail -f /var/log/lsyncd.log
Thu Jan 22 17:45:02 2026 Normal: recursive startup rsync: /var/www/html/cmon-repos/ -> cc2:/var/www/html/cmon-repos/
Thu Jan 22 17:45:02 2026 Normal: recursive startup rsync: /usr/share/ccmgr/ -> cc2:/usr/share/ccmgr/
Thu Jan 22 17:45:02 2026 Normal: recursive startup rsync: /etc/ -> cc2:/etc/
Thu Jan 22 17:45:03 2026 Normal: Startup of /var/www/html/clustercontrol-mcc/ -> cc2:/var/www/html/clustercontrol-mcc/ finished.
Thu Jan 22 17:45:04 2026 Normal: Startup of /etc/ -> cc2:/etc/ finished.
Thu Jan 22 17:45:04 2026 Normal: Startup of /var/lib/cmon/ -> cc2:/var/lib/cmon/ finished.
Thu Jan 22 17:45:04 2026 Normal: Startup of /usr/share/ccmgr/ -> cc2:/usr/share/ccmgr/ finished.
Thu Jan 22 17:45:04 2026 Normal: Startup of /etc/cmon.d/ -> cc2:/etc/cmon.d/ finished.
Thu Jan 22 17:45:04 2026 Normal: Startup of /root/.s9s/ -> cc2:/root/.s9s/ finished.
Thu Jan 22 17:45:04 2026 Normal: Startup of /var/www/html/cmon-repos/ -> cc2:/var/www/html/cmon-repos/ finished.
5.11. On cc2, enable keepalived on boot and start it up:
5.12. On cc2, you should see it is entering the
BACKUPstate and you don't see the VIP there:$ grep Keepalived /var/log/syslog 2026-01-22T16:42:24.652694+00:00 cc1 Keepalived[720]: Starting VRRP child process, pid=730 2026-01-22T16:42:24.652701+00:00 cc1 Keepalived[720]: Startup complete 2026-01-22T16:42:24.652722+00:00 cc1 Keepalived_vrrp[730]: (VI_1) Entering BACKUP STATE (init)5.13. Verify that only cc1 has the VIP:
cc1:
$ ip a | grep global  # on cc1
inet 192.168.73.201/24 brd 192.168.73.255 scope global eth0
inet 192.168.73.200/32 scope global eth0
cc2:
5.14. Verify that we have the
POSTROUTINGchain configured, to force VIP as the outbound address on cc1:$ iptables -t nat -L POSTROUTING -n --line-numbers Chain POSTROUTING (policy ACCEPT) num target prot opt source destination 1 SNAT all -- 0.0.0.0/0 0.0.0.0/0 to:192.168.73.200At this moment, ClusterControl on cc1 is the primary and cc2 is the secondary (replica).
-
Host Preparation (All Nodes)
1.1. Configure
/etc/hostson all nodes (cc1, cc2, and prom):tee -a /etc/hosts <<EOF 192.168.73.200 ccvip.local ccvip 192.168.73.201 cc1.local cc1 192.168.73.202 cc2.local cc2 192.168.73.209 prom.local prom EOF1.2. Generate SSH keys on cc1:
1.3. Prepare root SSH access on all nodes (cc2 and prom):
mkdir -p /root/.ssh
chmod 700 /root/.ssh
vi /root/.ssh/id_rsa    # copy the content of /root/.ssh/id_rsa on cc1 here
chmod 600 /root/.ssh/id_rsa
1.4. Copy the public key to all nodes:
# Get the public key
cat /root/.ssh/id_rsa.pub

# On each node (cc1, cc2, prom), add to authorized_keys
tee -a /root/.ssh/authorized_keys <<EOF
# paste public key here
EOF
1.5. Configure SSH to allow root login with key:
sed -i 's/^#PermitRootLogin.*/PermitRootLogin prohibit-password/' /etc/ssh/sshd_config
systemctl restart sshd
1.6. Verify passwordless SSH from cc1 to all nodes:
1.7. Disable firewalld to simplify deployment (or configure appropriate rules):
-
Keepalived Installation (cc1 and cc2)
Keepalived provides a virtual IP service and it will be used as the single-endpoint access for ClusterControl services. The ClusterControl GUI will be accessible via VIP, for example:
https://192.168.73.200/.2.1. Install Keepalived and iptables on both ClusterControl nodes:
2.2. Enable non-local IP binding:
2.3. Create the SNAT management script
/etc/keepalived/manage_snat.shon both cc1 and cc2 to force outbound connections to use the VIP:tee /etc/keepalived/manage_snat.sh <<'EOF' #!/bin/bash ## Change me VIP='192.168.73.200' INTERFACE='eth0' ## TYPE=$1 NAME=$2 STATE=$3 case $STATE in "MASTER") # Add the SNAT rule when this node takes the VIP iptables -t nat -A POSTROUTING -o $INTERFACE -j SNAT --to-source $VIP ;; "BACKUP"|"FAULT") # Remove the SNAT rule when this node loses the VIP iptables -t nat -D POSTROUTING -o $INTERFACE -j SNAT --to-source $VIP ;; *) exit 1 ;; esac EOFAttention
Adjust
INTERFACE='eth0'andVIP='192.168.73.200'to match your network interface and virtual IP address. Check withip aorifconfig.2.4. Make the script executable:
2.5. Configure Keepalived on cc1 (priority 105):
tee /etc/keepalived/keepalived.conf <<'EOF'
vrrp_script check_cmon {
script "/usr/bin/killall -0 cmon"
interval 2
weight 2
}
vrrp_instance VI_1 {
state BACKUP
nopreempt
interface ens18
virtual_router_id 51
priority 105
advert_int 1
authentication {
    auth_type PASS
    auth_pass 1113
}
virtual_ipaddress {
    192.168.73.200    # the VIP
}
track_script {
    check_cmon
}
# Execute the script on any state change
# Instruct outbound to use VIP
notify /etc/keepalived/manage_snat.sh
}
EOF
2.6. Configure Keepalived on cc2 (priority 100):
tee /etc/keepalived/keepalived.conf <<'EOF'
vrrp_script check_cmon {
script "/usr/bin/killall -0 cmon"
interval 2
weight 2
}
vrrp_instance VI_1 {
state BACKUP
nopreempt
interface ens18
virtual_router_id 51
priority 100
advert_int 1
authentication {
    auth_type PASS
    auth_pass 1113
}
virtual_ipaddress {
    192.168.73.200    # the VIP
}
track_script {
    check_cmon
}
# Execute the script on any state change
# Instruct outbound to use VIP
notify /etc/keepalived/manage_snat.sh
}
EOF
Attention
Change the
interfaceandvirtual_ipaddressvalues accordingly.2.7. Ensure Keepalived is stopped on cc1 and cc2 and we will start Keepalived later, after we have configured file replication:
-
MySQL Server Setup (cc1 and cc2)
To simplify the failover/resyncing process, we will use MySQL 8 which provides the CLONE plugin. Otherwise, by default, ClusterControl would install and use MariaDB 10.5 on Rocky 9.
We will first install MySQL on cc1 and cc2, and we will tell ClusterControl installer script to use this MySQL server instead.
3.1. Install MySQL Server on cc1 and cc2:
3.2. On cc1 and cc2, start MySQL server for initialization and then stop it:
3.3. On cc1, update MySQL configuration file at
/etc/my.cnf.d/mysql-server.cnfby adding the following lines under the[mysqld]section:innodb_buffer_pool_size = 2G # 50% of server's 4GB RAM server-id = 1 log_bin = mysql-bin binlog_format = ROW gtid_mode = ON enforce_gtid_consistency= ON log_slave_updates = ON binlog_expire_logs_seconds = 604800 bind-address = 0.0.0.0 # CLONE plugin plugin-load-add = mysql_clone.so clone = FORCE_PLUS_PERMANENT clone_valid_donor_list = 'cc1:3306,cc2:3306'3.4. On cc2, update MySQL configuration file at
/etc/my.cnf.d/mysql-server.cnfby adding the following lines under the[mysqld]section (the difference isserver-id):innodb_buffer_pool_size = 2G # 50% of server's 4GB RAM server-id = 2 log_bin = mysql-bin binlog_format = ROW gtid_mode = ON enforce_gtid_consistency= ON log_slave_updates = ON binlog_expire_logs_seconds = 604800 bind-address = 0.0.0.0 # CLONE plugin plugin-load-add = mysql_clone.so clone = FORCE_PLUS_PERMANENT clone_valid_donor_list = 'cc1:3306,cc2:3306'3.5. Start MySQL and run secure installation on both nodes:
Set root password when prompted (e.g.,
Secur3_p4ssword).Attention
If you choose
YesforVALIDATE PASSWORD COMPONENT, you need to set very strong passwords for all MySQL-related accounts in this documentation. -
ClusterControl Installation (cc1 and cc2)
4.1. As root, install ClusterControl on cc1:
wget https://severalnines.com/downloads/cmon/install-cc
chmod +x install-cc
./install-cc    # follow the installation wizard
4.2. Stop all ClusterControl services and disable cmon on boot:
4.3. Repeat steps 4.1 and 4.2 on cc2. Make sure you stop ClusterControl services.
4.4. On cc1, set the VIP as the hostname value inside
/etc/cmon.cnf:4.5. On cc1, add the following line to define our Prometheus host inside
/etc/cmon.cnf:4.6. On cc1 and cc2, configure
/etc/default/cmonas below to allow ClusterControl RPC interface to listen to all IP addresses (including VIP): -
MySQL Replication Configuration
5.1. Configure MySQL on cc1 as primary:
-- mysql on cc1
CREATE USER 'clone'@'%' IDENTIFIED BY 'Secur3_p4ssword';
GRANT BACKUP_ADMIN, CLONE_ADMIN ON *.* TO 'clone'@'%';
-- for repl user, we use mysql_native_password plugin to simplify replication configuration
CREATE USER 'repl'@'%' IDENTIFIED WITH 'mysql_native_password' BY 'Secur3_p4ssword';
GRANT REPLICATION SLAVE, REPLICATION CLIENT ON *.* TO 'repl'@'%';
5.2. On cc2, initiate the clone to sync MySQL data from cc1:
5.3. On cc2, start the MySQL replication and check the status:
-- mysql on cc2
CHANGE REPLICATION SOURCE TO
    SOURCE_HOST = 'cc1',
    SOURCE_USER = 'repl',
    SOURCE_PASSWORD = 'Secur3_p4ssword',
    SOURCE_AUTO_POSITION = 1;
5.4. Start the replication and check the replication status:
5.5. Make sure you see the following:
The above means cc2 MySQL is actively replicating from cc1.
5.6. On cc2, configure MySQL to be a read-only replica to protect against accidental writes:
-
File Synchronization Setup
6.1. Install rsync and lsyncd on cc1 and cc2:
6.2. Clear up all existing lines inside
/etc/lsyncd.confand add the following lines on cc1:settings { logfile = "/var/log/lsyncd.log", statusFile = "/var/log/lsyncd.status", statusInterval = 10, insist = true } -- 1. Sync for directories (Add trailing slashes to source) local sync_dirs = { "/var/lib/cmon/", "/etc/cmon.d/", "/home/cloud-user/.s9s/", "/var/www/html/clustercontrol-mcc/", "/var/www/html/cmon-repos/", "/usr/share/ccmgr/" } for _, path in ipairs(sync_dirs) do sync { default.rsync, source = path, -- The trailing slash here means "sync contents" target = "cloud-user@cc2:" .. path, rsync = { archive = true, compress = true, verbose = true, rsync_path = "sudo rsync", _extra = {"--delete"}, } } end -- 2. Sync for the individual files sync { default.rsync, source = "/etc/", target = "cloud-user@cc2:/etc/", rsync = { archive = true, compress = true, verbose = true, rsync_path = "sudo rsync", _extra = { "--include=/cmon.cnf", "--include=/cmon-events.cnf", "--include=/s9s.cnf", "--exclude=*", "--delete" } } }6.3. Clear up all existing lines inside
/etc/lsyncd.confand add the following lines on cc2:settings { logfile = "/var/log/lsyncd.log", statusFile = "/var/log/lsyncd.status", statusInterval = 10, insist = true } -- 1. Sync for directories (Add trailing slashes to source) local sync_dirs = { "/var/lib/cmon/", "/etc/cmon.d/", "/home/cloud-user/.s9s/", "/var/www/html/clustercontrol-mcc/", "/var/www/html/cmon-repos/", "/usr/share/ccmgr/" } for _, path in ipairs(sync_dirs) do sync { default.rsync, source = path, -- The trailing slash here means "sync contents" target = "cloud-user@cc1:" .. path, rsync = { archive = true, compress = true, verbose = true, rsync_path = "sudo rsync", _extra = {"--delete"} } } end -- 2. Sync for the individual files sync { default.rsync, source = "/etc/", target = "cloud-user@cc1:/etc/", rsync = { archive = true, compress = true, verbose = true, rsync_path = "sudo rsync", _extra = { "--include=/cmon.cnf", "--include=/cmon-events.cnf", "--include=/s9s.cnf", "--exclude=*", "--delete" } } }6.4. Start Keepalived service on cc1 only, so VIP will be available on cc1 before we can start ClusterControl services:
6.5. Start ClusterControl services on cc1 only:
6.6. Ping ClusterControl RPC interface for
cid 0on cc1 only, make sure you get the "Ok" reply:6.7. Start the lsyncd service on cc1 only and make sure it is running (DO NOT START it on cc2):
6.8. We will intentionally set lsyncd to NOT start on boot for both cc1 and cc2:
6.9. Monitor the file syncing operation. Make sure you see something similar to below:
$ tail -f /var/log/lsyncd.log
Thu Jan 22 17:45:02 2026 Normal: recursive startup rsync: /var/www/html/cmon-repos/ -> cc2:/var/www/html/cmon-repos/
Thu Jan 22 17:45:02 2026 Normal: recursive startup rsync: /usr/share/ccmgr/ -> cc2:/usr/share/ccmgr/
Thu Jan 22 17:45:02 2026 Normal: recursive startup rsync: /etc/ -> cc2:/etc/
Thu Jan 22 17:45:03 2026 Normal: Startup of /var/www/html/clustercontrol-mcc/ -> cc2:/var/www/html/clustercontrol-mcc/ finished.
Thu Jan 22 17:45:04 2026 Normal: Startup of /etc/ -> cc2:/etc/ finished.
Thu Jan 22 17:45:04 2026 Normal: Startup of /var/lib/cmon/ -> cc2:/var/lib/cmon/ finished.
Thu Jan 22 17:45:04 2026 Normal: Startup of /usr/share/ccmgr/ -> cc2:/usr/share/ccmgr/ finished.
Thu Jan 22 17:45:04 2026 Normal: Startup of /etc/cmon.d/ -> cc2:/etc/cmon.d/ finished.
Thu Jan 22 17:45:04 2026 Normal: Startup of /root/.s9s/ -> cc2:/root/.s9s/ finished.
Thu Jan 22 17:45:04 2026 Normal: Startup of /var/www/html/cmon-repos/ -> cc2:/var/www/html/cmon-repos/ finished.
6.10. On cc2, enable keepalived on boot and start it up:
6.11. On cc2, you should see it is entering the
BACKUPstate and you don't see the VIP there:$ grep Keepalived /var/log/messages 2026-01-22T16:42:24.652694+00:00 cc1 Keepalived[720]: Starting VRRP child process, pid=730 2026-01-22T16:42:24.652701+00:00 cc1 Keepalived[720]: Startup complete 2026-01-22T16:42:24.652722+00:00 cc1 Keepalived_vrrp[730]: (VI_1) Entering BACKUP STATE (init)6.12. Verify that only cc1 has the VIP:
cc1:
$ ip a | grep global  # on cc1
inet 192.168.73.201/24 brd 192.168.73.255 scope global eth0
inet 192.168.73.200/32 scope global eth0
cc2:
6.13. Verify that we have the
POSTROUTINGchain configured, to force VIP as the outbound address on cc1:$ iptables -t nat -L POSTROUTING -n --line-numbers Chain POSTROUTING (policy ACCEPT) num target prot opt source destination 1 SNAT all -- 0.0.0.0/0 0.0.0.0/0 to:192.168.73.200At this moment, ClusterControl on cc1 is the primary and cc2 is the secondary (replica).
Deployment summary
To summarize the setup up until this point:
- VIP is on cc1. Check with
iporifconfigcommand. - Only ClusterControl services on cc1 are running, while all ClusterControl services on cc2 are stopped.
- Only lsyncd service on cc1 is running, while lsyncd service on cc2 is stopped.
- We haven't configured Prometheus for monitoring yet. This will happen after we have deployed/imported a cluster into ClusterControl. See below.
Access ClusterControl GUI at https://192.168.73.200 and complete the initial setup.
Deploy/Import the first cluster
It is necessary to have the first cluster in order to configure an external Prometheus server, as we don't want ClusterControl to use a local Prometheus on cc1 (and/or cc2).
-
Login to ClusterControl GUI using the VIP at
https://192.168.73.200/. Register the first admin user and continue. -
If the host has Internet connection, ClusterControl will be automatically configured with a 30-day trial license.
-
Configure SSH key-based authentication using the same private key from cc1 to all DB nodes.
-
Deploy or import a cluster using the Deploy a cluster wizard.
-
After the deployment/import job completes, ClusterControl will configure and install Prometheus on 192.168.73.209 (
prom.local) automatically (as configured previously). Verify this by looking at the Nodes page.
Once a Prometheus is running correctly, we can conclude ClusterControl Replication is fully set up now.
Management
Failover from cc1 to cc2
In order to activate cc2, the following conditions must be true:
- All ClusterControl services are stopped on cc1.
- MySQL server is stopped on cc1.
- Lsyncd service is stopped on cc1.
- Or you can just perform an OS shutdown on cc1.
Stop MySQL replication on cc2, reset binary log and disable read-only:
--- mysql on cc2
STOP REPLICA;
RESET MASTER;
RESET SLAVE ALL;
SET GLOBAL read_only=0;
SET GLOBAL super_read_only=0;
Start ClusterControl services on cc2:
Start lsyncd on cc2:
At this point, cc2 is the primary and is holding the VIP (because Keepalived checks if cmon is running on this host).
The following diagram visualize the current topology after cc2 is promoted:
flowchart TD
    U[/DBA/<br>SysAdmin/] --> V((VIP))
    A[ClusterControl A<br>#40;**offline**#41;]
    V --> |active|B[ClusterControl B<br>#40;**primary**#41;]
    subgraph "ClusterControl Replication"
        A
        B
    end
    B --> C([Prometheus])
    B ==> |outbound <br>via VIP|V ==> D[[Database/<br>Load balancer nodes]]
Preparing old cc1 as secondary
Let's say cc1 was down, and we have promoted cc2, and cc1 has come back up. We must reconfigure cc1 to replicate from cc2 (the current primary).
Make sure the following services are stopped:
On cc1, run the following clone statement to sync MySQL data from cc2:
On cc1, start the MySQL replication and check the status:
-- mysql on cc1
CHANGE REPLICATION SOURCE TO
  SOURCE_HOST = 'cc2',
  SOURCE_USER = 'repl',
  SOURCE_PASSWORD = 'Secur3_p4ssword',
  SOURCE_AUTO_POSITION = 1;
Start the replication and check the replication status:
Make sure you see the following:
The above means MySQL on cc1 is actively replicating from cc2.
On cc1, configure MySQL to be a read-only replica to protect against accidental writes:
At this point, cc2 is the primary ClusterControl, and cc1 is the secondary.
The following diagram visualize the current topology after cc2 is promoted, and cc1 is the secondary and syncing with the primary:
flowchart TD
    U[/DBA/<br>SysAdmin/] --> V((VIP))
    V -..-> |standby|A[ClusterControl A<br>#40;**secondary**#41;]
    V --> |active|B[ClusterControl B<br>#40;**primary**#41;]
    B -..-> |replicate|A
    subgraph "ClusterControl Replication"
        A
        B
    end
    A --> C([Prometheus])
    B --> C
    B ==> |outbound <br>via VIP|V ==> D[[Database/<br>Load balancer nodes]]
Tip
To promote cc1 as the primary, repeat steps described previously in the failover process. Failover from cc1 to cc2 but swap cc2 with cc1 and vice versa.
Outbound connections using VIP
In this setup, when a ClusterControl node is holding the virtual IP address (VIP), it is important to force the kernel to use the VIP as the source IP address of an outbound connection. We can achieve this by using iptables NAT table. This has been incorporated automatically in the Keepalived notify event to run manage_snat.sh script as shown in the Keepalived installation section.
For understanding purposes, if you want to add the rule manually, use the -A flag:
To remove the rule manually, use the -D flag instead:
Or, you can also remove a rule using the line number:
iptables -t nat -L POSTROUTING -n --line-numbers    # list out the rules with line numbers
iptables -t nat -D POSTROUTING 1                    # delete the iptables rule on line 1
Otherwise, the kernel would use the primary IP address of eth0 (192.168.73.201 for cc1 and 192.168.73.202 for cc2) for outbound connectivity. This will possibly cause issues because these IP addresses are not being explicitly granted during the deploy/import stage.