Certificate Management
An SSL/TLS certificate is a small file that proves the identity of a server (and sometimes a client) and enables encrypted connections between them. In ClusterControl, a Certificate Authority (CA) is a self-signed "master" certificate that can be used to sign other certificates, called server and client certificates. Once signed by the same CA, the server and its clients trust one another and can establish an encrypted connection.
Certificate Management is ClusterControl's central repository for generating, importing, and organizing these keys and certificates. Certificates created or imported here can be assigned to any database cluster managed by ClusterControl to enable client-server SSL/TLS encryption, without needing to run any manual OpenSSL commands. You can access it by going to ClusterControl GUI → Settings → Certificate management.
By default, generated and imported keys and certificates are stored under /var/lib/cmon/ca on the ClusterControl Controller host.
Info
Certificate Management only creates and stores keys/certificates. To actually turn on encryption for a cluster's database connections using a certificate from this repository, see Encryption settings under Cluster Management → Cluster Actions.
Best practices and management notes
- Plan your Common Name (CN) values carefully. The CN used for a server or client certificate must be different from the CN used for its issuing CA certificate. If they are the same, the certificate and key files will not work with servers compiled using OpenSSL.
- Use a key length of 2048 bits or higher. The longer the key, the harder it is to crack, at a small performance cost when establishing new connections.
- Track expiration dates. An expired certificate can silently break replication or client connections. Set a realistic Expiration Date (days) and calendar a reminder to renew or reissue before it lapses.
- Prefer Revoke over Delete. Revoking a certificate marks it invalid (and can be published in a Certificate Revocation List) while keeping a record of it. Deleting removes the certificate and key files permanently and cannot be undone. Only delete when you are certain the certificate is no longer needed anywhere.
- Regenerate the CRL after revoking. If you rely on Certificate Revocation Lists to reject revoked certificates, regenerate the issuing CA's CRL right after a revocation so the change takes effect.
- Back up the CA repository. The
/var/lib/cmon/cadirectory holds every key and certificate ClusterControl manages. Back it up along with your regular ClusterControl controller backups so you can recover encrypted clusters after a disaster. - Duplicate certificates are not recreated. Importing or generating a certificate with information identical to an existing one will not create a second copy.
- No dedicated CLI command exists yet. Certificate generation, import, revocation, and deletion are managed through the ClusterControl GUI or the RPC API. The
s9sCLI can only enable/disable SSL on an existing cluster using certificates that already exist in the repository.
Access Certificate Management
- Log in to your ClusterControl GUI.
- Click Settings in the left sidebar.
- Click Certificate management. This opens a panel listing all folders and certificates currently stored in the repository.
The s9s CLI does not have a dedicated command to browse or manage the certificate repository. It can, however, use certificates that already exist in the repository to enable SSL on a cluster, or supply your own certificate files when registering an existing cluster:
| Option | Description |
|---|---|
--enable-ssl |
Enables SSL connections on the cluster's nodes. |
--disable-ssl |
Disables SSL connections on the cluster's nodes. |
--with-ssl |
Sets up SSL while creating a new cluster. |
--ssl-ca=PATH |
Path (on the controller) to an existing SSL CA file to use. |
--ssl-cert=PATH |
Path (on the controller) to an existing SSL certificate file to use. |
--ssl-key=PATH |
Path (on the controller) to an existing SSL key file to use. |
--ssl-pass=PASSWD |
Password for an existing CA private key, if any, when registering a cluster. |
Enable SSL on an existing MySQL/MariaDB cluster (ID 36) using certificates already stored in the repository:
Certificate operations are available under the /v2/ca path. All calls require a TLS connection and, in most cases, an authenticated session or inline credentials. See ClusterControl RPC API → Authenticating with the API for details.
| Operation | Description |
|---|---|
listCerts |
List CA, server, and client certificates. |
certInfo |
Get details about a specific certificate. |
create |
Create a signed (self-signed or CA-signed) certificate. |
revoke |
Mark a certificate as revoked. |
delete |
Delete a certificate and its private key files. |
move |
Move/rename a certificate within the CA storage. |
crl |
Create a Certificate Revocation List (CRL) signed by a specified CA. |
importlocal |
Import a certificate already present on the controller host. |
For the full request/response reference of every operation, see Reference Manuals → API/SDK → ClusterControl RPC API → Certificate Authority (CA).
View the certificate list
The main panel shows every folder and certificate in the repository as a browsable tree, together with a toolbar for common actions.
| Field/Button | Description |
|---|---|
| Create Folder | Creates a new folder under the currently selected directory, useful for grouping certificates (for example, one folder per cluster). |
| Refresh | Reloads the certificate and folder list from the repository. |
| More… | Opens the menu to Generate Client/Server Certificate, Generate Self-signed Certificate, or Import certificate. |
Clicking on any certificate in the tree opens its details, including its status (Issued/Revoked), validity period, key size, and which hosts or clusters currently use it.
- Log in to your ClusterControl GUI → Settings → Certificate management.
- Click on a folder to expand it, or click Create Folder to add a new one.
- Click on any certificate to view its details in the side panel.
- Click Refresh at any time to make sure you are looking at the latest state of the repository.
The s9s CLI has no dedicated command to browse the certificate repository. Use the ClusterControl GUI or the RPC API tab instead.
List every CA, server, and client certificate in the repository:
Get the details of a specific certificate by its id (as returned by listCerts):
Generate a self-signed Certificate Authority (CA)
A self-signed CA is the "root of trust" you use to sign other certificates. Create one first if you don't already have a CA to work with.
- Log in to your ClusterControl GUI → Settings → Certificate management.
- Click More… → Generate Self-signed Certificate.
-
Fill in the certificate details:
Field Description Path Certificate repository path. Click the file browser on the left side to change it. Default is /var/lib/cmon/ca.Certificate Authority and Key Name A name without an extension, for example MyCAorca-cert.Description A short description for the certificate authority. Country Country name, chosen from the dropdown. State State or province name. Locality City name. Organization Organization name. Organization unit Unit or department name. Common name The server's fully qualified domain name (FQDN) or your own name. This value must be different from the Common Name used for any server/client certificate this CA will sign. Email Contact email address. Key length (bits) Key size in bits. Use 2048 or higher. Expiration Date (days) Number of days the certificate stays valid. -
Click Generate to create the CA certificate and key, or Reset to clear the form and start over.
The s9s CLI has no dedicated command to generate a Certificate Authority. Use the ClusterControl GUI or the RPC API tab instead.
Create a self-signed CA certificate named exampleCa1, valid for 3650 days (10 years):
curl -k -XPOST \
-d '{
   "operation":"create",
   "type":"ca",
   "name":"exampleCa1",
   "validity":3650,
   "data":{
     "keybits":4096,
     "CN":"My CA certificate.",
     "description":"This is an example CA certificate.",
     "emailAddress":"[email protected]"
   }
}' \
-b cookies.jar \
https://localhost:9501/v2/ca
Info
type, name, and validity are required for every create call. Set type to ca to generate a Certificate Authority, or to the appropriate type for a server or client certificate, as described in Generate a client or server certificate.
Generate a client or server certificate
Once you have a CA (or if you only need a quick self-signed certificate), you can generate the server certificate that a database will present, and the client certificate used by applications or replicas to connect.
Attention
The Common Name (CN) used for the server and client certificates must each be different from the Common Name used for the CA certificate. Using the same CN causes the certificate and key files to stop working on servers compiled using OpenSSL.
- Log in to your ClusterControl GUI → Settings → Certificate management.
- Click More… → Generate Client/Server Certificate.
-
Fill in the certificate details:
Field Description Certificate Authority Select an existing CA from the left-hand side menu to sign this certificate, or leave it empty to generate a self-signed certificate instead. Type Server – for use by the database server. Client – for use by an application or replicating node. Certificate and Key Name The name ClusterControl uses to generate the certificate and key files. For example, entering Severalninesgeneratesseveralnines.crtandseveralnines.key.Description A short description for the certificate. Country Country name, chosen from the dropdown. State State or province name. Locality City name. Organization Organization name. Organization unit Unit or department name. Common name The server's FQDN or your own name. Must differ from the CA's Common Name. Email Contact email address. Key length (bits) Key size in bits. Use 2048 or higher. Expiration Date (days) Number of days the certificate stays valid. -
Click Generate to create the certificate and key, or Reset to clear the form.
The s9s CLI has no dedicated command to generate a client or server certificate. Use the ClusterControl GUI or the RPC API tab instead.
The create operation accepts type: "server" and type: "client" in addition to type: "ca". To sign a server or client certificate with an existing CA, use the ClusterControl GUI wizard instead (see the GUI tab above), which handles CA selection for you. See Reference Manuals → API/SDK → ClusterControl RPC API → create for the full parameter reference.
Import an existing certificate
If you already have certificates issued by an external or corporate CA, import them into the repository so ClusterControl can use them the same way as a generated one.
Before importing, make sure to:
- Upload your certificate and key files to a directory on the ClusterControl Controller host.
- Uncheck Self-signed Certificate if the certificate is not self-signed.
- Also provide the CA certificate if the imported certificate is not self-signed.
Note
Duplicate certificates will not be created. Importing the same certificate twice has no additional effect.
- Log in to your ClusterControl GUI → Settings → Certificate management.
-
Click More… → Import certificate.
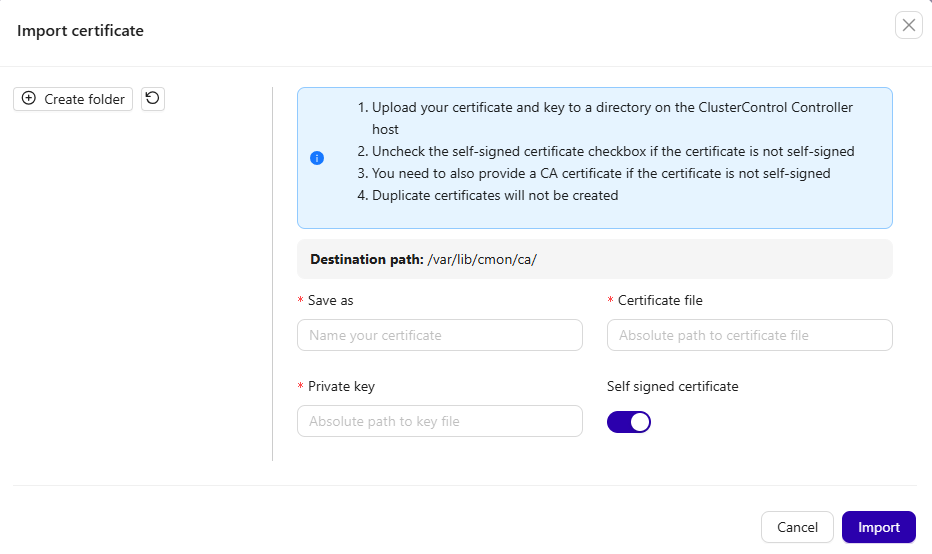
-
Fill in the import details:
Field Description Destination Path Where the certificate will be imported to. Click the file explorer on the left to change the path. Save As Name to store the imported certificate under. Certificate File Absolute path to the certificate file, for example /home/user/ssl/file.crt.Private Key File Absolute path to the key file, for example /home/user/ssl/file.key.Self-signed Certificate Uncheck this if the certificate is not self-signed. -
Click Import to start the import process.
The s9s CLI has no dedicated command to import a certificate into the repository. Use the ClusterControl GUI or the RPC API tab instead.
Import a client certificate, its key, and its issuing CA certificate from files already present on the controller host:
curl -k -XPOST \
-d '{
   "operation":"importlocal",
   "cert_file": "/tmp/TestCLIENT.crt",
   "key_file": "/tmp/TestCLIENT.key",
   "ca_file": "/tmp/TestingCA007.crt",
   "name": "testing/import/testClient",
   "name_ca": "testing/import/testCA"
}' \
-b cookies.jar \
https://localhost:9501/v2/ca
ca_file/name_ca are optional and only needed when the certificate being imported is not self-signed and not already known to ClusterControl.
Move or rename a certificate
Use this to reorganize the certificate repository, for example moving a certificate into a per-cluster folder after generating it in the root directory.
- Log in to your ClusterControl GUI → Settings → Certificate management.
- Select the certificate you want to reorganize.
- Drag it into the destination folder, or use the certificate's Actions menu to move it, then confirm the new path.
The s9s CLI has no dedicated command to move or rename a certificate. Use the ClusterControl GUI or the RPC API tab instead.
Revoke a certificate
Revoking marks a certificate as no longer trusted without deleting its files, which keeps a record for audit purposes. This is the recommended way to retire a certificate.
- Log in to your ClusterControl GUI → Settings → Certificate management.
- Select the certificate you want to revoke.
- Open its Actions menu and click Revoke.
- Confirm the action.
The s9s CLI has no dedicated command to revoke a certificate. Use the ClusterControl GUI or the RPC API tab instead.
Revoke certificate ID 227:
curl -k -XPOST \
-d '{
   "operation":"revoke",
   "id": 227
}' \
-b cookies.jar \
https://localhost:9501/v2/ca
Note
Regenerate the issuing CA's Certificate Revocation List (CRL) after revoking so client applications that check the CRL immediately stop trusting the revoked certificate. Pass the issuing CA's id to the crl operation, not the revoked certificate's own id. A CRL can only be generated from a CA certificate that is still valid (not itself revoked). See Generate a Certificate Revocation List (CRL).
Generate a Certificate Revocation List (CRL)
A Certificate Revocation List (CRL) is a signed list of certificates a given CA has revoked. Distributing an up-to-date CRL lets database servers and clients reject connections that present a revoked certificate, even if that certificate hasn't expired yet.
The s9s CLI has no dedicated command to generate a Certificate Revocation List. Use the RPC API tab instead.
Generate a CRL signed by CA certificate ID 229:
curl -k -XPOST \
-d '{
   "operation":"crl",
   "id": 229
}' \
-b cookies.jar \
https://localhost:9501/v2/ca
The response includes the path to the generated .crl file inside the certificate repository, which you can then distribute to the hosts that need to validate it.
Attention
The id must belong to a CA certificate that is still valid (status Issued). If the CA itself has already been revoked, this call fails with No valid certificate found with id <id>.
Delete a certificate
Warning
Deleting removes the certificate and private key files permanently. This is a destructive, unusual operation. Use Revoke instead whenever possible.
- Log in to your ClusterControl GUI → Settings → Certificate management.
- Select the certificate you want to remove.
- Open its Actions menu and click Delete.
- Confirm the action.
The s9s CLI has no dedicated command to delete a certificate. Use the ClusterControl GUI or the RPC API tab instead.