Table of Contents
This article outlines how to perform firstly the offline installation of Severalnines ClusterControl and secondly deploying database clusters on hosts (virtual machines or bare-metal servers) that do not have an internet connection.
The document is divided into two parts where part one contains instructions on setting up a software repository host that will serve up a database, third-party tools, and OS software packages to database hosts. Part two contains instructions on how to set up ClusterControl on a host that does not have an internet connection. All hosts in this article are running on CentOS/RockyLinux/AlmaLinux 8 & 9, which uses the YUM/DNF package manager.
Part one and part two can be performed independently of each other. However, the repo server must be ready prior to deploying database clusters from ClusterControl.
We will use the following naming convention for the hosts:
- Satellite repository server (connected to the Internet, reachable by ClusterControl and database servers via local network)
- ClusterControl server (offline)
- Database servers (offline)
Setting up Satellite Repository Server
The satellite server is considered the offline repository server to be used by ClusterControl when deploying database servers and the corresponding tools. This server should have an internet connection since we need to pull the necessary repositories into it. Let’s call this “repo server”. This server will store and host thousands of packages so do allocate sufficient disk space to the repository directory (/var/www/html/repos) in advance.
Setting up OS, OS tools and third-party utility repositories
1. Set up a web server on the repo server to serve up packages to the yum package manager remotely:
$ dnf install -y nginx
$ systemctl start nginx
$ systemctl enable nginx
$ systemctl status nginx
2. Set up software required for a remote repository server:
$ yum install -y createrepo yum-utils
$ yum -y install epel-release
3. Configure the nginx in the Satellite Server.
sudo vi /etc/nginx/conf.d/repos.conf
 server {
        listen   80;
        server_name  192.168.100.100;
        root   /var/www/html/repos;
    index index.html;
    location / {
                autoindex on;
        }
}
4. Restart the nginx service
$ systemctl restart nginx
$ chcon -Rt httpd_sys_content_t /var/www/html/repos/
5. Set up repository directory to be served by the web server:
$ mkdir -p /var/www/html/repos/rhel6. Perform repository syncing with the appropriate repositories (the following commands will consume time to finish):
$ dnf reposync -g --delete -p /var/www/html/repos/rhel/ --repoid=baseos --newest-only --download-metadata
$ dnf reposync -g --delete -p /var/www/html/repos/rhel/ --repoid=appstream--newest-only --download-metadata
$ dnf reposync -g --delete -p /var/www/html/repos/rhel/ --repoid=extras --newest-only --download-metadata
-- For AlmaLinux/RockyLinux/CentOS 9 (CodeReadyBuilder)
$ dnf config-manager set-enabled crb
$ dnf reposync -g --delete -p /var/www/html/repos/rhel/ --repoid=crb--newest-only --download-metadata
-- For AlmaLinux/RockyLinux/CentOS 8 (Powertools)
$ dnf config-manager set-enabled powertools
$ dnf reposync -g --delete -p /var/www/html/repos/rhel/ --repoid=powertools--newest-only --download-metadata
Adding Severalnines repository to the repo server
1. Import the public key of Severalnines
$ rpm --import http://repo.severalnines.com/severalnines-repos.asc2. Download the s9s-repo fom the Severalnines Repository
$ wget http://www.severalnines.com/downloads/cmon/s9s-repo.repo -P /etc/yum.repos.d/3. Edit the s9s-repo.repo and add the following content:
[s9s-tools]
name=s9s-tools (RHEL_8)
type=rpm-md
baseurl=http://repo.severalnines.com/s9s-tools/{os_codename}
gpgcheck=1
gpgkey=http://repo.severalnines.com/s9s-tools/{os_codename}/repodata/repomd.xml.key
enabled=1
Replace {os_codename} based on the list of Operating System code below: RHEL_7,RHEL_8,RHEL_9,CentOS_7,CentOS_8,CentOS_9.
4. Create directory and perform repository sync:
$ mkdir -p /var/www/html/repos/s9s
$ dnf reposync -g --delete -p /var/www/html/repos/s9s/ --repoid=s9s-repo --newest-only --download-metadata
$ dnf reposync -g --delete -p /var/www/html/repos/s9s/ --repoid=s9s-tools --newest-only --download-metadata
Adding PostgreSQL repository to the repo server
1. Download the PostgreSQL release package from this page:
$ yum install https://download.postgresql.org/pub/repos/yum/reporpms/{os_code}-x86_64/pgdg-redhat-repo-latest.noarch.rpmReplace the {os_code} for each verion of Operating System; EL-7, EL-8, EL-9.
$ yum clean all
$ yum repolist
3. Set up the repository directory to be served by the web server for PostgreSQL:
$ mkdir -p /var/www/html/repos/postgresql4. Perform repository syncing:
$ dnf reposync --delete -p /var/www/html/repos/postgresql --repoid=pgdg-common --newest-only --download-metadata
$ dnf reposync --delete -p /var/www/html/repos/postgresql --repoid=pgdg16 --newest-only --download-metadata
$ dnf reposync --delete -p /var/www/html/repos/postgresql --repoid=pgdg15 --newest-only --download-metadata
$ dnf reposync --delete -p /var/www/html/repos/postgresql --repoid=pgdg14 --newest-only --download-metadata
$ dnf reposync --delete -p /var/www/html/repos/postgresql --repoid=pgdg13 --newest-only --download-metadata
$ dnf reposync --delete -p /var/www/html/repos/postgresql --repoid=pgdg12 --newest-only --download-metadata
Adding MongoDB repository to the repo server
The package name of the MongoDB server as seen in the yum command is yum install mongodb-org. Therefore, the /etc/yum.repos.d/mongodb-org.repo can only have one entry pointing to the appropriate version of MongoDB (one and only one of either 4.4, 5.0or 6.0).
1. Create a repo file located at /etc/yum.repos.d/mongodb-org.repo and make sure it has the following lines (the example shows we activate MongoDB 6.0):
# cat mongodb-org.repo
[mongodb-org-6.0-latest]
name=MongoDB lastest 6.0 Repository
baseurl=https://repo.mongodb.org/yum/redhat/$releasever/mongodb-org/6.0/x86_64/
gpgcheck=0
enabled=1
gpgkey=https://www.mongodb.org/static/pgp/server-6.0.asc

#[mongodb-org-5.0]
#name=MongoDB Repository
#baseurl=https://repo.mongodb.org/yum/redhat/$releasever/mongodb-org/5.0/x86_64/
#gpgcheck=1
#enabled=1
#gpgkey=https://www.mongodb.org/static/pgp/server-5.0.asc
Disable GPGkey checking if you don’t have an internet connection. Furthermore, only one version (i.e., either 6.0, 5.0, 4.4) can be supported at any given time. The reason is, that all the versions are called “mongodb-org”.
2. Clear the repository cache and list out the repositories, make sure the newly added MongoDB repository is in the list:
$ yum clean all
$ yum repolist
3. Set up the repository directory to be served by the web server for MongoDB:
$ mkdir -p /var/www/html/repos/mongodb4. Perform repository syncing:
$ dnf reposync --delete -p /var/www/html/repos/mongodb --repoid=mongodb-org-6.0-latest --newest-only --download-metadata
Adding Percona MongoDB repository to the repo server
The package name of the Percona MongoDB server as seen in the yum command is yum install percona-server-mongodb. Therefore, the /etc/yum.repos.d/mongodb-org.repo can only have one entry pointing to the appropriate version of MongoDB (one and only one of either 4.4, 5.0 or 6.0).
1. Create a repo file located at /etc/yum.repos.d/percona-mongodb.repo and make sure it has the following lines (the example shows we activate Percona MongoDB 6.0):
[psmdb-60-release-x86_64]
name = Percona Server for MongoDB 6.0 release/x86_64 YUM repository
baseurl = http://repo.percona.com/psmdb-60/yum/release/$releasever/RPMS/x86_64
enabled = 1
gpgcheck = 0
#gpgkey = file:///etc/pki/rpm-gpg/PERCONA-PACKAGING-KEY

[psmdb-60-release-noarch]
name = Percona Server for MongoDB 6.0 release/noarch YUM repository
baseurl = http://repo.percona.com/psmdb-50/yum/release/$releasever/RPMS/noarch
enabled = 1
gpgcheck = 0
#gpgkey = file:///etc/pki/rpm-gpg/PERCONA-PACKAGING-KEY

[psmdb-60-release-sources]
name = Percona Server for MongoDB 6.0 release/sources YUM repository
baseurl = http://repo.percona.com/psmdb-60/yum/release/$releasever/SRPMS
enabled = 0
gpgcheck = 0
#gpgkey = file:///etc/pki/rpm-gpg/PERCONA-PACKAGING-KEY

[tools-release-x86_64]
name = Percona Tools release/x86_64 YUM repository
baseurl = http://repo.percona.com/tools/yum/release/$releasever/RPMS/x86_64
enabled = 1
gpgcheck = 0
#gpgkey = file:///etc/pki/rpm-gpg/PERCONA-PACKAGING-KEY

[tools-release-noarch]
name = Percona Tools release/noarch YUM repository
baseurl = http://repo.percona.com/tools/yum/release/$releasever/RPMS/noarch
enabled = 1
gpgcheck = 0
#gpgkey = file:///etc/pki/rpm-gpg/PERCONA-PACKAGING-KEY

[tools-release-sources]
name = Percona Tools release/sources YUM repository
baseurl = http://repo.percona.com/tools/yum/release/$releasever/SRPMS
enabled = 0
gpgcheck = 0
#gpgkey = file:///etc/pki/rpm-gpg/PERCONA-PACKAGING-KEY
Disable GPGkey checking if you don’t have an internet connection. Furthermore, only one version (i.e., either 6.0, 5.0, 4.4) can be supported at any given time. The reason is, that all the versions are called “percona-server-mongodb”.
2. Clear the repository cache and list out the repositories, make sure the newly added MongoDB repository is in the list:
$ yum clean all
$ yum repolist
3. Set up the repository directory to be served by the web server for Percona:
$ mkdir -p /var/www/html/repos/percona4. Perform repository syncing:
$ dnf reposync --delete -p /var/www/html/repos/percona --repoid=psmdb-60-release-x86_64 --newest-only --download-metadata
$ dnf reposync --delete -p /var/www/html/repos/percona --repoid=tools-release-x86_64 --newest-only --download-metadata
Adding Oracle MySQL repository to the repo server
1. Download the appropriate Oracle MySQL community release package from this page:
$ yum install https://dev.mysql.com/get/mysql84-community-release-{os_code}-1.noarch.rpm Replace the {os_code} for each verion of Operating System; el7, el8, el9.
$ yum clean all
$ yum repolist
3. Set up the repository directory to be served by the web server for Oracle:
$ mkdir -p /var/www/html/repos/oracle4. Perform repository syncing:
$ dnf reposync --delete -p /var/www/html/repos/oracle --repoid=mysql80-community --newest-only --download-metadata
$ dnf reposync --delete -p /var/www/html/repos/oracle --repoid=mysql-connectors-community --newest-only --download-metadata
$ dnf reposync --delete -p /var/www/html/repos/oracle --repoid=mysql-tools-community --newest-only --download-metadata
$ dnf reposync --delete -p /var/www/html/repos/oracle --repoid=mysql-cluster-8.0-community --newest-only --download-metadata
Adding Percona MySQL repository to the repo server
1. Download the appropriate Percona MySQL release package from this page:
$ yum install https://repo.percona.com/yum/percona-release-latest.noarch.rpm
2. Enable the Percona Server for MSQL 8.0 (the latest version at the time of this writing):
$ percona-release setup ps803. Clear the repository cache and list out the repositories, make sure the newly added Percona Server repository is in the list:
$ yum clean all
$ yum repolist
4. Set up the repository directory to be served by the web server for Percona (if not exists):
$ mkdir -p /var/www/html/repos/percona5. Perform repository syncing:
$ dnf reposync --delete -p /var/www/html/repos/percona --repoid=ps-80-release-x86_64 --newest-only --download-metadataAdding MariaDB repository to the repo server
1. Install the MariaDB repository by using the following script, taken from this page:
$ curl -LsS https://r.mariadb.com/downloads/mariadb_repo_setup | sudo bash2. Clear the repository cache and list out the repositories, make sure the newly added MariaDB repository is in the list:
$ yum clean all
$ yum repolist
3. Set up the repository directory to be served by the web server for MariaDB:
$ mkdir -p /var/www/html/repos/mariadb4. Perform repository syncing:
$ dnf reposync --delete -p /var/www/html/repos/mariadb --repoid=mariadb-main --newest-only --download-metadata
$ dnf reposync --delete -p /var/www/html/repos/mariadb --repoid=mariadb-maxscale --newest-only --download-metadata
$ dnf reposync --delete -p /var/www/html/repos/mariadb --repoid=mariadb-tools --newest-only --download-metadata
Creating Repository
Now we have downloaded all the necessary packages, it is time to create the repository on the repo server:
$ createrepo /var/www/html/repos/rhel
$ createrepo /var/www/html/repos/s9s
$ createrepo /var/www/html/repos/postgresql
$ createrepo /var/www/html/repos/mongodb
$ createrepo /var/www/html/repos/percona
$ createrepo /var/www/html/repos/oracle
$ createrepo /var/www/html/repos/mariadb
Just to give some heads up on the disk usage, here is how much you need for the repository directory:
$ du -sh /var/www/html/repos
38G   /var/www/html/repos/
At this point, the repo server should be ready with all the necessary packages for OS, OS tools, third-party dependencies (Perl, Python, wget, tar, socat, net-tools, etc) and databases such as MySQL, MariaDB, PostgreSQL, MongoDB (from MongoDB Org and Percona). We should see the following directory listing under /var/www/html/repos:
$ tree -d -L 2 /var/www/html/repos
.
├── mariadb
│   ├── mariadb-main
│   ├── mariadb-maxscale
│   ├── mariadb-tools
│   └── repodata
├── mongodb
│   ├── mongodb-org-6.0-latest
│   └── repodata
├── oracle
│   ├── mysql57-community
│   ├── mysql80-community
│   ├── mysql-cluster-7.6-community
│   ├── mysql-cluster-8.0-community
│   ├── mysql-connectors-community
│   ├── mysql-tools-community
│   └── repodata
├── percona
│   ├── ps-80-release-x86_64
│   ├── psmdb-60-release-x86_64
│   ├── repodata
│   └── tools-release-x86_64
├── postgresql
│   ├── pgdg13
│   ├── pgdg14
│   ├── pgdg-common
│   └── repodata
└── rhel
    ├── base
    ├── epel
    ├── repodata
    └── updates
Setting Up Database Nodes
Next, we need to set up the following things on all database nodes:
- Configure passwordless SSH from the ClusterControl node to all database nodes.
- Configure the package repository to be pointing to the satellite server.
Suppose there are 3 database nodes to deploy a PostgreSQL Streaming Replication, with the following host details:
- 192.168.100.100 – Repo server
- 192.168.100.200 – ClusterControl
- 192.168.100.211 – PostgreSQL db1
- 192.168.100.212 – PostgreSQL db2
- 192.168.100.213 – PostgreSQL db3
Configure Passwordless SSH
Make sure the appropriate user (root or sudo user) can SSH from the ClusterControl node to the database nodes.
1. On the ClusterControl server, generate an SSH key to be used for passwordless SSH:
$ whoami
root
$ ssh-keygen -t rsa # press Enter on all prompts
2. Copy this SSH key to all the database nodes:
$ ssh-copy-id [email protected] # db1
$ ssh-copy-id [email protected] # db2
$ ssh-copy-id [email protected] # db3
If the database server does not support SSH password authentication, you need to copy the SSH public key located at /root/.ssh/id_rsa.pub on the ClusterControl server into /root/.ssh/authorized_keys on every database node. See Passwordless SSH for more details.
3. Verify that you should be able to execute the following command without error:
$ ssh [email protected] "ls -l /sbin"We have now configured the passwordless SSH.
Configure OS Repository
Perform the following commands on all nodes (ClusterControl and all database nodes):
1. Create a backup directory to existing the repository definition files:
$ mkdir ~/repos.d.backup2. Move existing repository definition files to the backup directory:
$ mv /etc/yum.repos.d/*.repo ~/repos.d.backup3. Create a repository definition file pointing to the repo server created in Setting up Satellite Repository Server.
$ vi /etc/yum.repos.d/satellite.repoAnd add the following lines:
[rhel]
name=RHEL Local Repo Server
baseurl=http://192.168.100.100/repos/rhel
enabled=1
gpgcheck=0
4. Refresh the repository list:
$ sudo yum clean all
$ sudo yum repolist # make sure only the above repository is listed
Configure Severalnines Repository
Perform the following commands on ClusterControl nodes:
1. Create a repository definition file pointing to the repo server created in Setting up Satellite Repository Server.
$ vi /etc/yum.repos.d/s9s.repoAnd add the following lines:
[s9s-repo]
name = Severalnines Release Repository
baseurl=http://192.168.100.100/s9s-repo/
enabled=1
gpgcheck=0

[s9s-tools]
name = Severalnines Tools Repository
baseurl=http://192.168.100.100/s9s-tools/
enabled=1
gpgcheck=0
2. Refresh the repository list:
$ sudo yum clean all
$ sudo yum repolist # make sure only the above repository is listed
Configure Database Repository
Perform the following commands on all database nodes, based on the database type that each node wants to deploy.
1. Create a backup directory to existing the repository definition files:
$ mkdir ~/repos.d.backup2. Move existing repository definition files to the backup directory:
$ mv /etc/yum.repos.d/*.repo ~/repos.d.backup3. Create a repository definition file pointing to the repo server created in Setting up Satellite Repository Server.
For MariaDB (MariaDB Server, MariaDB Galera):
$ vi /etc/yum.repos.d/mariadb.repoAnd add the following lines:
[mariadb]
name=MariaDB Local Repo Server
baseurl=http://192.168.100.100/repos/mariadb
enabled=1
gpgcheck=0
For MongoDB Inc (MongoDB):
$ vi /etc/yum.repos.d/mongodb.repoAnd add the following lines:
[mongodb]
name=MongoDB Local Repo Server
baseurl=http://192.168.100.100/repos/mongodb
enabled=1
gpgcheck=0
For Percona (Percona Server, Percona XtraDB Cluster, Percona Server for MongoDB):
$ vi /etc/yum.repos.d/percona.repoAnd add the following lines:
[percona]
name=Percona Local Repo Server
baseurl=http://192.168.100.100/repos/percona
enabled=1
gpgcheck=0
For PostgreSQL:
$ vi /etc/yum.repos.d/postgresql.repoAnd add the following lines:
[postgresql]
name=PostgreSQL Local Repo Server
baseurl=http://192.168.100.100/repos/postgresql
enabled=1
gpgcheck=0
For Oracle (MySQL Replication, MySQL Cluster):
$ vi /etc/yum.repos.d/oracle.repoAnd add the following lines:
[oracle]
name=Oracle Local Repo Server
baseurl=http://192.168.100.100/repos/oracle
enabled=1
gpgcheck=0
4. Refresh the repository list:
$ sudo yum clean all
$ sudo yum repolist # make sure only the above repository is listed
The repository configuration is now complete. We may proceed to perform ClusterControl installation and subsequently deploy our database clusters without an Internet connection.
ClusterControl Offline Installation
For offline installation, ClusterControl now support using the install-cc script with offline mode:
- Install MySQL or MariaDB server for CMON database
- Download
install-ccand install the ClusterControl
Install MySQL/MariaDB
MariaDB will be used by ClusterControl to store configuration and monitoring data for its operation.
1. On the ClusterControl server, run the following commands to install MariaDB and configure the MariaDB root password:
$ dnf clean all
$ dnf repolist
$ dnf install mariadb mariadb-server
$ systemctl enable mariadb
$ systemctl start mariadb
$ mysqladmin -uroot password yourR00tP4ssw0rd
Or you can install the MySQL and configure the password:
$ dnf install mysql-community-server
$ systemctl start mysqld
$ systemctl status mysqld
$ systemctl enable mysqld
Check the default root password for MySQL in /var/log/mysqld.log. Later you can reset the root password based on the policy.
mysql -u root -p
mysql> ALTER USER 'root'@'localhost' IDENTIFIED BY 'xxx';
Installation ClusterControl
2. Download the install-cc from this link and put the file into ClusterControl hosts. Give execute permission to the file.
$ chmod +x install-cc3. The install-cc support offline installation by adding the parameter OFFLINE=1. Execute the following in ClusterControl host for the installation:
$ S9S_ADMIN_EMAIL="[email protected]" OFFLINE=1 S9S_ROOT_PASSWORD="XXX" S9S_CMON_PASSWORD="YYY" ./install-ccFill the S9S_ADMIN_EMAIL using your email, S9S_ROOT_PASSWORD with the correct password and S9S_CMON_PASSWORD you defined.
S9S_ADMIN_EMAIL to be passed to the script to simplify the installation).Answer all the questions to complete the installation. Specify the MySQL/MariaDB root password when asked, as configured under the Install MySQL/MariaDB section.
You should see the following lines:
 ClusterControl installation completed!
Open your web browser to https://10.0.2.15 and create a default Admin User.
If you want to uninstall ClusterControl then please follow the instructions here, https://severalnines.com/docs/administration.html#uninstall
You may ignore the error because the installer script was trying to reach out to the internet for reverse lookup which is expected. Open the ClusterControl UI and register a super admin user to start deploying database clusters.
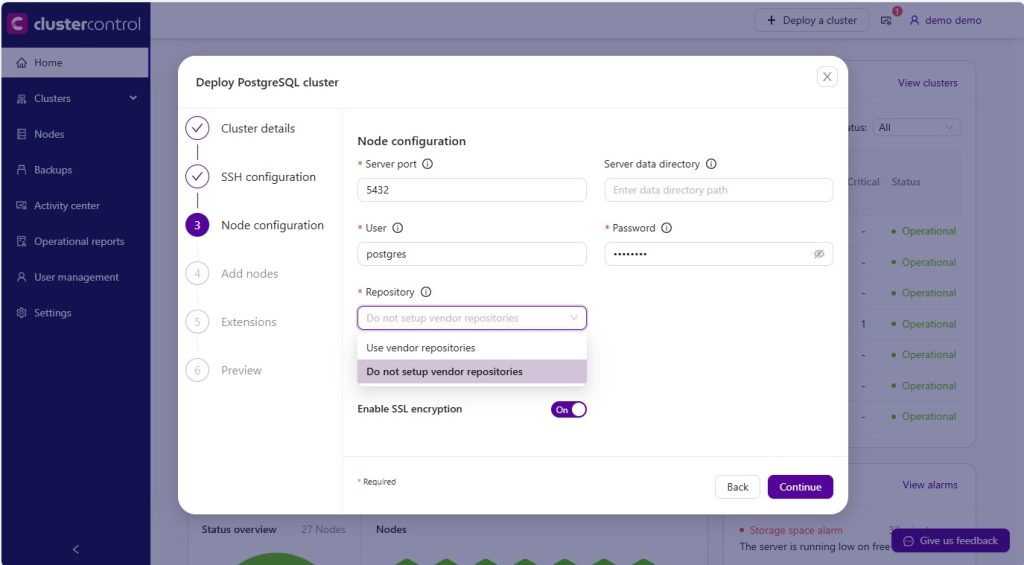
Offline Database Deployment using ClusterControl
Once you are logged in to ClusterControl UI, you may proceed to deploy a database cluster by going to ClusterControl → Deploy and filling up all necessary details. One thing in particular for this kind of environment, you have to choose “Do Not Setup Vendor Repositories” under the Repository dropdown, since we already preconfigured the repository definition as shown in the Configure Database Repository section:
If you would like to deploy a cluster by using CluserControl CLI for the deployment, do not forget to specify --use-internal-repos flag, as shown below:
$ s9s cluster --create \
        --cluster-type=postgresql \
        --nodes="192.168.100.211?master;192.168.100.212?slave;192.168.100.213?slave;" \
        --db-admin="postgres" \
        --db-admin-passwd="mySuperStongP455w0rd" \
        --cluster-name=ft_replication_23986 \
        --os-user=root \
        --os-key-file=/root/.ssh/id_rsa \
        --provider-version=13 \
        --use-internal-repos \
        --log
That’s it. The database deployment should be able to use the satellite repository server for an offline installation.
Setting up Prometheus exporters
For the offline installation of Prometheus and its exporters, you need to download all the required packages first and put the packages in the ClusterControl node (put in under /var/cache/cmon/packages).
The URL of the packages can be found in /usr/share/cmon/templates/packages.conf as shown below:
$ cat /usr/share/cmon/templates/packages.conf
#
# ClusterControl central URL database for
# 3rd party packages installed directly
# (not using APT/YUM repos)
#

[maxscale]
# clustercontrol will substitute the following keywords:
# @VENDOR@  : debian/ubuntu...
# @RELEASE@ : 5,6,7,xenial,wily...
url_deb="https://downloads.mariadb.com/MaxScale/2.5.7/packages/@VENDOR@/@RELEASE@/maxscale-2.5.7-1.@VENDOR@.@[email protected]_64.deb"
url_rpm="https://downloads.mariadb.com/files/MaxScale/2.5.7/packages/rhel/@RELEASE@/maxscale-2.5.7-1.rhel.@[email protected]_64.rpm"

[haproxy]
url_source="http://www.haproxy.org/download/1.8/src/haproxy-1.8.9.tar.gz"

[keepalived]
url_source="http://www.keepalived.org/software/keepalived-1.2.24.tar.gz"

[epel]
# To be substituted:
# @RELEASE@ : 6,7,8
url_rpm="http://dl.fedoraproject.org/pub/epel/epel-release-latest-@[email protected]"

[prometheus]
# requiredVersion: if such or greater version found
# clustercontrol will use the existing installed package
requiredVersion=2.29
url="https://github.com/prometheus/prometheus/releases/download/v2.29.2/prometheus-2.29.2.linux-amd64.tar.gz"

[haproxy_exporter]
requiredVersion=0.9
url="https://github.com/prometheus/haproxy_exporter/releases/download/v0.9.0/haproxy_exporter-0.9.0.linux-amd64.tar.gz"

[node_exporter]
requiredVersion=1.0.1
url="https://github.com/prometheus/node_exporter/releases/download/v1.0.1/node_exporter-1.0.1.linux-amd64.tar.gz"

[mysqld_exporter]
requiredVersion=0.13
url="https://github.com/prometheus/mysqld_exporter/releases/download/v0.13.0/mysqld_exporter-0.13.0.linux-amd64.tar.gz"

[postgres_exporter]
requiredVersion=0.4.7
url="https://github.com/wrouesnel/postgres_exporter/releases/download/v0.4.7/postgres_exporter_v0.4.7_linux-amd64.tar.gz"

[pgbouncer_exporter]
requiredVersion=0.4.0
url="https://github.com/prometheus-community/pgbouncer_exporter/releases/download/v0.4.0/pgbouncer_exporter-0.4.0.linux-amd64.tar.gz"

[proxysql_exporter]
requiredVersion=1.1
url="https://github.com/percona/proxysql_exporter/releases/download/v1.1.0/proxysql_exporter-1.1.0.linux-amd64.tar.gz"

[process_exporter]
requiredVersion=0.10.10
url="https://github.com/kedazo/process_exporter/releases/download/0.10.10/process_exporter-0.10.10.linux-amd64.tar.gz"

[mongodb_exporter]
requiredVersion=0.11.0
url="https://github.com/kedazo/mongodb_exporter/releases/download/v0.11.0/mongodb_exporter-v0.11.0.linux-amd64.tar.gz"

[redis_exporter]
requiredVersion=1.15.0
url="https://github.com/oliver006/redis_exporter/releases/download/v1.15.0/redis_exporter-v1.15.0.linux-amd64.tar.gz"

## for MSSQL
[mssql_exporter]
requiredVersion=0.5.4
url="https://github.com/severalnines/mssql_exporter/releases/download/0.5.4/mssql_exporter-0.5.4.linux-amd64.tar.gz"

[daemon]
url_rpm="http://libslack.org/daemon/download/daemon-0.6.4-1.x86_64.rpm"
After the dependencies exist on the server, you may proceed to enable Prometheus agent-based monitoring by going to ClusterControl → Dashboards → Enable Agent-based Monitoring.