Table of Contents
Introduction
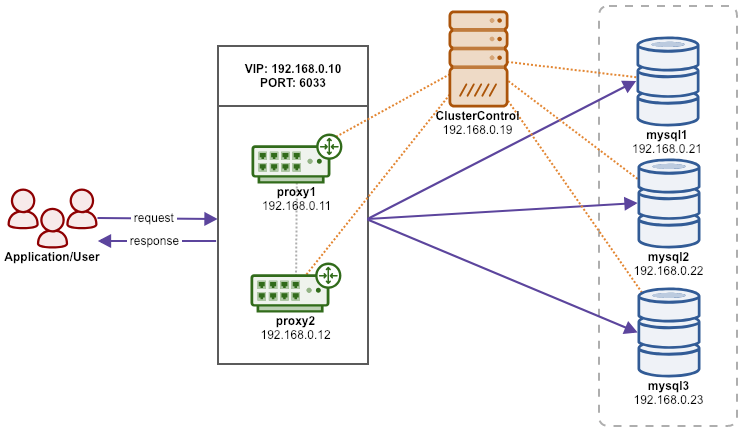
In this example, we are going to deploy a production-grade three-node Percona XtraDB Cluster with two ProxySQL servers as load balancers sitting on top of the cluster. The ProxySQL will be configured with two types of hostgroups:
- Single writer hostgroup (writes are forwarded to one MySQL node)
- Multiple writers hostgroup (writes are distributed to multiple nodes)
A virtual IP address (provided by Keepalived) will be floating between these ProxySQL instances, providing a single endpoint for the application tier to connect.
All nodes are having similar characteristics as the following:
- OS: CentOS 7
- SSH user: root
- SSH port: 22
- Firewall: disabled
- SELinux: disabled
- MySQL major version: 5.7
We are going to use 5 servers in this setup:
| Hostname | IP address | Role |
|---|---|---|
| cc | 192.168.0.19 | ClusterControl |
| proxy1 | 192.168.0.11 | ProxySQL + Keepalived + VIP: 192.168.0.10 (eth1) |
| proxy2 | 192.168.0.12 | ProxySQL + Keepalived + VIP: 192.168.0.10 (eth1) |
| mysql1 | 192.168.0.21 | Percona XtraDB Cluster |
| mysql2 | 192.168.0.22 | Percona XtraDB Cluster |
| mysql3 | 192.168.0.23 | Percona XtraDB Cluster |
The following diagram illustrates the architecture:
Database Deployment
1. Go to the ClusterControl download page and you will get the instructions to download ClusterControl’s installer file. On the ClusterControl node, follow the steps provided, for example:
$ wget -O install-cc https://severalnines.com/scripts/install-cc?yAg_P9AydY-0H_PjJB3tl69pPLKUI4BwV94I6dOQg3c1
$ chmod +x install-cc
$ ./install-cc
2. Generate an SSH key for user root on ClusterControl node:
$ whoami
root
$ ssh-keygen -t rsa # press Enter on all promptsThe SSH private and public keys will be generated under /root/.ssh directory.
3. Configure passwordless SSH for user root from the ClusterControl node to all database and proxy nodes. On ClusterControl node:
$ whoami
root
$ ssh-copy-id 192.168.0.11
$ ssh-copy-id 192.168.0.12
$ ssh-copy-id 192.168.0.21
$ ssh-copy-id 192.168.0.22
$ ssh-copy-id 192.168.0.23
4. Open ClusterControl UI in the browser, http://192.168.0.19/clustercontrol, and register a super admin user.
5. Open ClusterControl deployment wizard at Deploy (top menu) and pick MySQL Galera. Specify the following details under the General & SSH Settings section:
- SSH User:
root - SSH Key Path:
/root/.ssh/id_rsa - SSH Port:
22 - Cluster Name:
Percona XtraDB Cluster 5.7 - Install Software:
True - Disable Firewall:
True - Disable AppArmor/SELinux:
True
6. Proceed to the next step under the Define MySQL Servers section. Specify the following details:
- Vendor:
Percona XtraDB - Version:
5.7 - Server Data Directory:
/var/lib/mysql - Server Port:
3306 - Configuration Template:
my57.cnf.galera - Admin/Root Password:
s3cr3tP455 - Repository:
Use Vendor Repositories - Add Node:
192.168.0.21(pressEnter ),192.168.0.22(pressEnter ),192.168.0.23(pressEnter )
7. Proceed with the deployment by clicking the Deploy button. Monitor the job progress under ClusterControl → Activity → Jobs → Create Cluster. This may take a while depending on the hardware specs and internet connection. Once the deployment completes, ClusterControl will list it out in the cluster list.
Load Balancer Deployment
8. Next, deploy ProxySQL by clicking on the cluster, then go to Manage → Load Balancers → ProxySQL → Deploy ProxySQL (also accessible via Cluster Actions shortcut on the top right of the summary bar). You will be presented with a ProxySQL deployment wizard. Enter the following details:
- Server Address:
192.168.0.11 - Admin Port:
6032 - Listening POrt:
6033 - Import Configuration:
False - Use Native Clustering:
True - Administration User:
proxysql-admin - Administration Password:
s3cr3tP455 - Monitor User:
proxysql-monitor - Monitor Password:
s3cr3tP455 - Create New DB User:
True - DB User:
sakila - DB Password:
s3cr3tP455 - DB Name:
sakila.* - Type in MySQL Privileges(s):
ALL PRIVILEGES - Include:
True(for all servers) - Max Replication Lag:
10(for all servers) - Max Connection:
100(for all servers) - Weight:
1(for all servers) - Are you using implicit transactions:
False(You use BEGIN or START TRANSACTION to create a transaction)
9. Proceed with ProxySQL deployment by clicking the Deploy ProxySQL button. Monitor the job progress under ClusterControl → Activity → Jobs → Installing ProxySQL. This may take a while depending on the hardware specs and internet connection. Once the deployment completes, you will see the ProxySQL instance listed under the Nodes tab.
10. Repeat steps 8 and 9 for the second ProxySQL instance. The only difference is the Server Address value which is “192.168.0.12”.
Virtual IP Deployment
11. Next, deploy Keepalived by going to Manage → Load Balancers → Keepalived → Deploy Keepalived. You will be presented with a Keepalived deployment wizard. Enter the following details:
- Load balancer type:
ProxySQL - Keepalived 1:
192.168.0.11 - Keepalived 2:
192.168.0.12 - Virtual IP:
192.168.0.10 - Network interface:
eth1
12. Proceed with Keepalived deployment by clicking the Deploy Keepalived button. Monitor the job progress under ClusterControl → Activity → Jobs → Deploy Keepalived. This may take a while depending on the hardware specs and internet connection. Once the deployment completes, you will see the Keepalived instance listed under the Nodes tab.
Deployment is now complete.
Importing Database
13. In this example, we are using a MySQL sample database called Sakila. On the ClusterControl node, download it to the $HOME path:
$ whoami
root
$ cd $HOME
$ wget http://downloads.mysql.com/docs/sakila-db.tar.gz
$ tar -xzf sakila-db.tar.gz
However, there are multiple dump files in the sakila-db directory. ClusterControl supports importing a single SQL dump file and it must be in either .sql, .sql.gz or .sql.bz2 format. Let’s merge sakila-data.sql into sakila-schema.sql so we can specify only sakila-schema.sql as the dump file path in ClusterControl UI:
$ cd sakila-db
$ cat sakila-data.sql >> sakila-schema.sql
14. From ClusterControl UI, pick the database cluster and go to Manage → Schemas and Users → Create Database and create a database called “sakila”.
15. Since we already created a MySQL user called “sakila” when deploying our ProxySQL servers (step 8 and 10), we don’t need to create another MySQL user for this purpose. However, if you want to create a new user, you may use the Users tab.
16. To import the database into the cluster, go to Manage → Schemas and Users → Import Database Dumpfile and specify the following details:
- Import dumpfile on:
192.168.0.21(pxc1) - Import dumpfile to database:
sakila - Specify path to dumpfile:
/root/sakila-db/sakila-schema.sql
17. Click Import to start importing the database. The tarball will be extracted and the mysqldump files will be copied over to the selected node and applied using the mysql client.
Connecting to the Database
To verify if the database is imported correctly, connect to either one of these endpoints as MySQL host/port combination:
- 192.168.0.10 port 6033 (Virtual IP address – recommended)
- 192.168.0.11 port 6033 (ProxySQL)
- 192.168.0.12 port 6033 (ProxySQL)
- 192.168.0.21 port 3306 (Percona XtraDB Cluster)
- 192.168.0.22 port 3306 (Percona XtraDB Cluster)
- 192.168.0.23 port 3306 (Percona XtraDB Cluster)
In the following example, we use the MySQL client to connect to the database via virtual IP address, 192.168.0.10:
$ mysql -usakila -p -h192.168.0.10 -P6033 sakila -e 'show tables'
Enter password:
+----------------------------+
| Tables_in_sakila           |
+----------------------------+
| actor                      |
| actor_info                 |
| address                    |
| category                   |
| city                       |
| country                    |
| customer                   |
| customer_list              |
| film                       |
| film_actor                 |
| film_category              |
| film_list                  |
| film_text                  |
| inventory                  |
| language                   |
| nicer_but_slower_film_list |
| payment                    |
| rental                     |
| sales_by_film_category     |
| sales_by_store             |
| staff                      |
| staff_list                 |
| store                      |
+----------------------------+
Our highly available database cluster is now ready to serve the applications.